
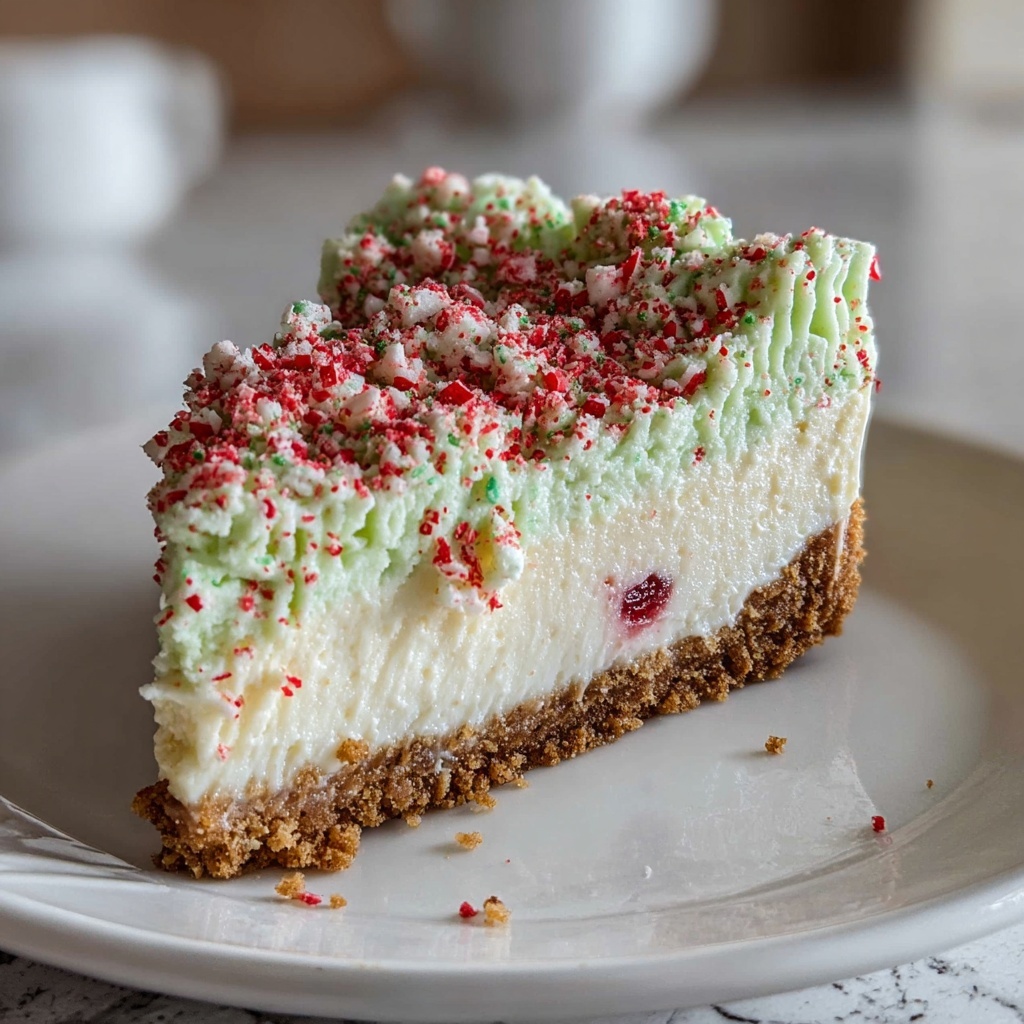
If you are searching for a dessert that perfectly captures the spirit of the holidays, look no further than Creating a Little Debbie Christmas Tree Cheesecake: A Festive Treat Recipe. This charming cheesecake combines a creamy, tangy base with festive green coloring and delightful red sprinkles that mimic a Christmas tree adorned with ornaments. It’s an irresistible and cheerful dessert that not only tastes incredible but also brings a joyful holiday vibe to any gathering. Whether you are an experienced baker or just starting out, this recipe offers an approachable way to celebrate the season with a show-stopping sweet treat.

Ingredients You’ll Need
Getting the ingredients right is half the fun and ensures your cheesecake turns out beautifully textured and full of flavor. Each element plays a crucial role, from creating a buttery crust to the luxuriously smooth and colorful cheesecake filling.
- 1 ½ cups graham cracker crumbs: This forms the classic crunchy base, giving your cheesecake the perfect foundation.
- ½ cup unsalted butter, melted: Helps bind the crust crumbs together while adding rich flavor.
- 2 cups cream cheese, softened: The silky, creamy heart of your cheesecake that brings depth and tang.
- 1 cup powdered sugar: Sweetens the filling smoothly without graininess.
- 1 teaspoon vanilla extract: Adds a warm, aromatic hint that enhances the overall taste.
- 2 cups whipped topping: Lightens the cheesecake mixture for a fluffy, melt-in-your-mouth texture.
- Green food coloring: Brings festive color to the cheesecake, transforming it into a Christmas tree.
- Red sprinkles for decoration: Mimic the look of ornaments, adding a playful pop of color and holiday cheer.
How to Make Creating a Little Debbie Christmas Tree Cheesecake: A Festive Treat Recipe
Step 1: Prepare and Bake the Crust
Begin by preheating your oven to 325°F (160°C), setting the stage for that perfectly crisp crust. In a mixing bowl, combine your graham cracker crumbs and melted butter, stirring until evenly moistened. Press the mixture firmly into the bottom of a springform pan, creating an even layer that will hold the filling without crumbling. Bake for 10 minutes to allow the crust to set and develop a toasty flavor, then let it cool completely before adding your luscious cheesecake layer.
Step 2: Create the Cheesecake Filling
Next, whisk the softened cream cheese until it’s wonderfully smooth and free of lumps. This step ensures your cheesecake will be silky and creamy. Gradually blend in the powdered sugar and vanilla extract, balancing sweetness with a fragrant undertone. The mixture should be consistent and fluffy, setting the tone for a perfect texture when chilled.
Step 3: Add Whipped Topping and Green Color
Gently fold in the whipped topping, which adds lightness and airiness to your cheesecake filling. Now, for the festive magic, add a few drops of green food coloring. Stir just until the color is evenly distributed and your cheesecake batter resembles a vibrant evergreen tree waiting to be decorated.
Step 4: Assemble and Chill
Pour your green cheesecake mixture carefully over the cooled crust, smoothing the top with a spatula to create a flawless surface. Transfer the assembled cheesecake to the refrigerator and chill for at least 4 hours, allowing the filling to set firmly and the flavors to meld beautifully.
Step 5: Decorate and Finish
Finally, before serving, sprinkle red decorations over the top to mimic Christmas tree ornaments. This simple step turns your cheesecake into a festive centerpiece that’s sure to impress both kids and adults alike.
How to Serve Creating a Little Debbie Christmas Tree Cheesecake: A Festive Treat Recipe
Garnishes
To truly enhance your Christmas tree cheesecake, consider adding a dusting of powdered sugar around the edges for a snowy effect, or top with mini edible silver balls to resemble twinkling lights. Fresh mint leaves can add a hint of green freshness and a nice contrast to the sweetness. These garnishes add elegance and elevate the festive look of your dessert.
Side Dishes
This cheesecake pairs beautifully with a hot cup of spiced coffee or a rich cup of hot cocoa, balancing the cool creaminess with warmth and spice. For a fruity twist, serve alongside a bowl of fresh berries or a tangy cranberry sauce to add brightness and complement the smooth cheesecake.
Creative Ways to Present
Bring the holiday spirit to your table by serving slices on decorative holiday plates or under a glass cloche sprinkled with fake snow for a magical presentation. You can also pipe whipped cream around the edges in patterns resembling a garland or place a few edible gold stars on top to create a sparkling tree effect. Presentation matters, especially with Creating a Little Debbie Christmas Tree Cheesecake: A Festive Treat Recipe, turning dessert time into a festive celebration.
Make Ahead and Storage
Storing Leftovers
Once you’ve enjoyed a few slices, cover the remaining cheesecake tightly with plastic wrap or store it in an airtight container. This helps prevent the cheesecake from absorbing fridge odors while keeping it moist and fresh. It will stay delicious for up to four days in the refrigerator.
Freezing
If you want to prepare this festive dessert well in advance, you can freeze it. Wrap the fully chilled cheesecake in plastic wrap followed by aluminum foil to prevent freezer burn. When properly stored, it can last up to two months in the freezer. Thaw in the refrigerator overnight before decorating and serving.
Reheating
Cheesecake is best served cold, so avoid reheating to preserve its texture. Just allow the cheesecake to sit at room temperature for about 20 minutes if it feels too firm right out of the fridge. This way, every spoonful melts smoothly on your tongue.
FAQs
Can I use different food colorings for this cheesecake?
Absolutely! While green food coloring is traditional for the Christmas tree effect, feel free to experiment with other festive colors like red or gold for different holiday themes. Just add a few drops gradually until you reach your desired shade.
Is it possible to make this cheesecake gluten-free?
Yes, simply swap the graham cracker crumbs for gluten-free crumbs or crushed gluten-free cookies. Ensure that the ingredients for melting butter and other toppings are gluten-free to keep the recipe safe for those with gluten sensitivities.
What can I substitute for whipped topping?
If you prefer, you can use homemade whipped cream or stabilized whipped cream instead of store-bought whipped topping. This will provide a fresh flavor and can be adapted to your taste preferences.
How long does it take for the cheesecake to set properly?
The cheesecake needs at least 4 hours in the refrigerator to fully set. For the best texture and easy slicing, chilling overnight is recommended.
Can I double this recipe for a larger crowd?
Definitely! Simply double all ingredients and use a larger springform pan or two pans. Just keep an eye on baking times for the crust and make sure the cheesecake has enough time to chill and set.
Final Thoughts
Creating a Little Debbie Christmas Tree Cheesecake: A Festive Treat Recipe is such a joyful way to bring holiday cheer to your dessert table. It’s fun to make, visually delightful, and absolutely delicious — perfect for sharing with family and friends during the festive season. I encourage you to try it and watch as it becomes a holiday tradition everyone looks forward to year after year.
Print
Creating a Little Debbie Christmas Tree Cheesecake: A Festive Treat Recipe
- Prep Time: 20 minutes
- Cook Time: 10 minutes
- Total Time: 4 hours 30 minutes
- Yield: 12 servings
- Category: Dessert
- Method: Baking
- Cuisine: American
- Diet: Vegetarian
Description
Celebrate the holidays with this delightful Little Debbie Christmas Tree Cheesecake, featuring a creamy green-tinted filling atop a buttery graham cracker crust, decorated festively with red sprinkles. Perfect for a festive dessert that’s both visually appealing and deliciously smooth.
Ingredients
Crust
- 1 ½ cups graham cracker crumbs
- ½ cup unsalted butter, melted
Filling
- 2 cups cream cheese, softened
- 1 cup powdered sugar
- 1 teaspoon vanilla extract
- 2 cups whipped topping
- green food coloring (a few drops)
Decoration
- red sprinkles for decoration
Instructions
- Preheat Oven: Preheat your oven to 325°F (160°C) to prepare for baking the crust.
- Prepare Crust Mixture: In a bowl, combine the graham cracker crumbs with melted unsalted butter until the mixture is evenly moistened.
- Shape Crust: Press the graham cracker and butter mixture firmly into the bottom of a springform pan to form the crust base.
- Bake and Cool Crust: Bake the crust in the preheated oven for 10 minutes, then remove and allow it to cool completely before adding the filling.
- Beat Cream Cheese: In a separate bowl, beat the softened cream cheese until smooth and creamy, ensuring no lumps remain.
- Add Sweeteners and Flavor: Incorporate the powdered sugar and vanilla extract into the cream cheese and mix thoroughly to combine.
- Fold in Whipped Topping and Color: Gently fold the whipped topping into the cream cheese mixture along with a few drops of green food coloring to achieve a festive green hue.
- Assemble Cheesecake: Pour the green cheesecake filling over the cooled graham cracker crust, spreading evenly.
- Chill: Refrigerate the assembled cheesecake for at least 4 hours to allow it to set properly and develop flavor.
- Decorate: Before serving, sprinkle red sprinkles over the top to resemble Christmas tree decorations for a festive touch.
Notes
- Ensure the cream cheese is softened to room temperature for a smooth filling without lumps.
- Press the crust firmly to avoid crumbling when slicing the cheesecake.
- Chilling time is important for the cheesecake to set; do not skip or shorten significantly.
- The green food coloring can be adjusted in amount depending on the desired shade.
- For a nutty twist, consider adding finely chopped nuts to the crust mixture.


