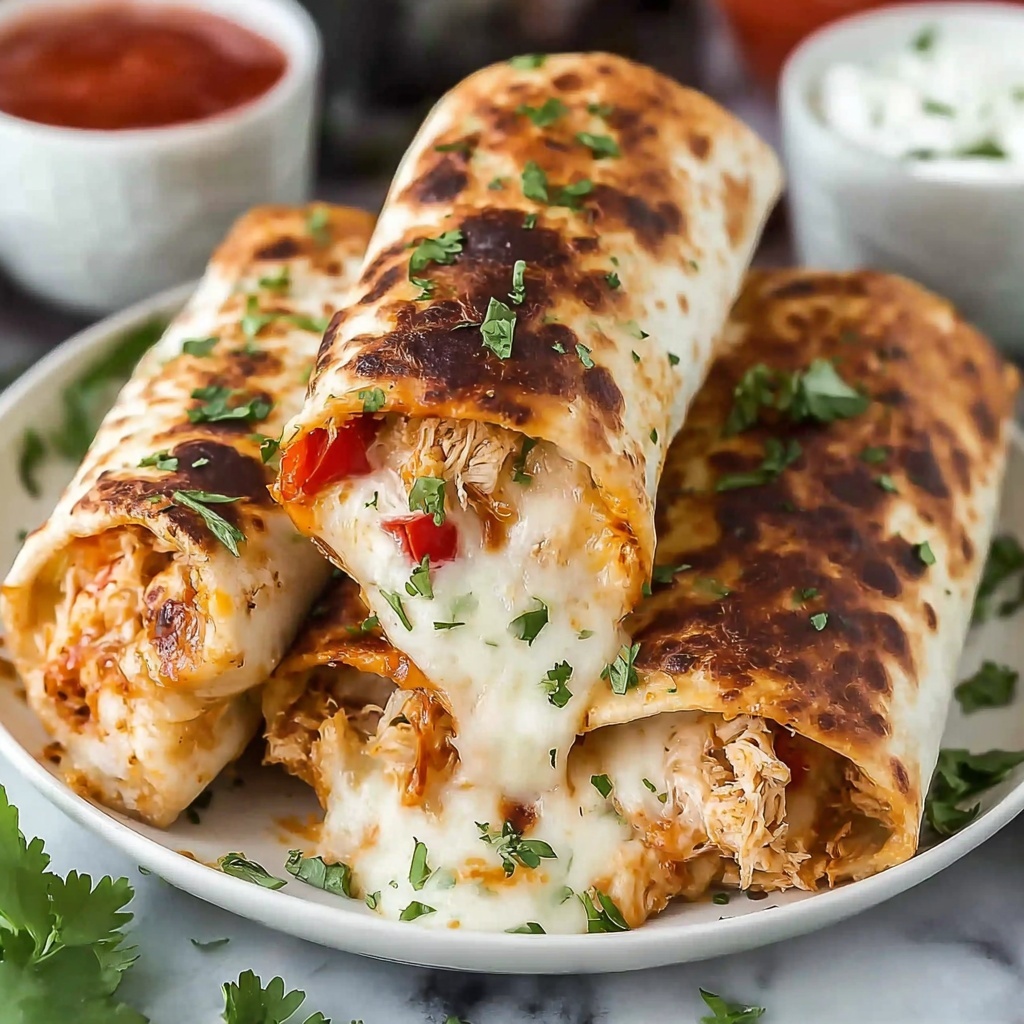
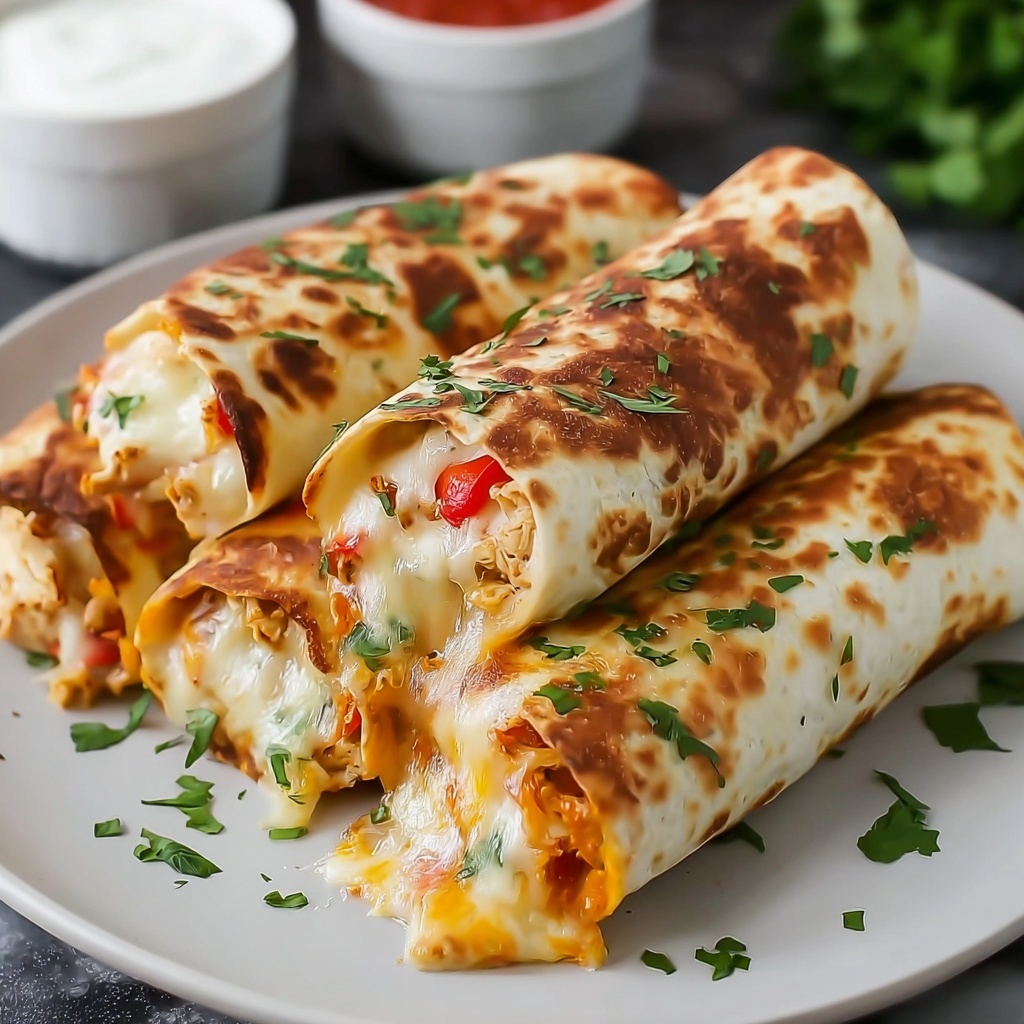
There is nothing quite like biting into crispy, golden Baked Chicken Chimichangas: Easy and Delicious Recipe, a dish that combines creamy spiced chicken filling with the satisfying crunch of baked tortillas. This recipe takes all the indulgence of traditional chimichangas but bakes them to crisp perfection, making it a lighter, mess-free delight that still delivers on every bit of flavor and texture you crave. Whether you’re planning a family dinner or a casual get-together, these chimichangas are a guaranteed crowd-pleaser that everyone will ask for again and again.

Ingredients You’ll Need
Each ingredient in this recipe works harmoniously to create a mouthwatering balance of creamy, spicy, and crispy elements that make these baked chicken chimichangas so irresistible. The simplicity of the ingredients also means you can easily find everything at your local grocery store without any fuss.
- Cream cheese: Adds a luscious creaminess that binds the filling together while keeping it tender and moist.
- Pepperjack cheese, shredded: Brings a kick of mild heat and melty texture for a beautifully gooey center.
- Taco seasoning: Infuses the chicken and cheese blend with classic Mexican-inspired spices that awaken every bite.
- Cooked chicken, shredded: The hearty protein base that’s flavorful and easy to mix with the creamy filling.
- Flour tortillas: The perfect canvas for rolling and baking, turning crispy and golden without frying.
- Cooking spray: Ensures the chimichangas bake to a crisp without sticking to your pan or excess oil.
- Shredded cheddar cheese (for garnish): Adds a sharp, melty finishing touch for extra richness and visual appeal.
- Green onions (for garnish): Freshens the dish with a pop of green and subtle onion aroma.
- Sour cream (for serving): Cool and creamy contrast that balances the spices.
- Salsa (for serving): Provides a tangy, zesty complement to the rich filling and crispy shell.
How to Make Baked Chicken Chimichangas: Easy and Delicious Recipe
Step 1: Mix the Cheeses and Seasoning
Start by combining the cream cheese, shredded Pepperjack cheese, and taco seasoning in a bowl. Stir until the mixture is smooth and creamy. This flavorful blend is the heart of your filling, so make sure the seasoning is evenly distributed for a consistent kick in every bite.
Step 2: Add Chicken
Next, gently fold the shredded cooked chicken into the cheese mixture. Make sure to coat the chicken thoroughly so that each shred gets enveloped in the spicy, cheesy goodness. This step ensures that every forkful delivers that irresistible smoky flavor and creamy texture.
Step 3: Fill and Roll
Lay out your flour tortillas flat and evenly divide the chicken and cheese mixture among them. Carefully tuck in the sides of each tortilla and roll it up nice and tight. Keeping the filling contained helps the chimichangas hold their shape and crisp up beautifully in the oven.
Step 4: Bake
Preheat your oven to 350°F (175°C). Spray a 9×13-inch baking dish with cooking spray to prevent sticking. Place each rolled chimichanga seam side down in the dish and spray their tops lightly. Bake for 15 minutes, then flip them over and bake for another 15 minutes until they are flawlessly golden and crispy on all sides.
Step 5: Serve
Once baked, pull these beauties out of the oven and garnish with shredded cheddar cheese and sliced green onions. Serve them hot alongside sour cream and salsa for dipping. The contrast between crisp exterior and creamy filling is something your taste buds will thank you for.
How to Serve Baked Chicken Chimichangas: Easy and Delicious Recipe
Garnishes
The perfect garnishes take these baked chicken chimichangas from delicious to unforgettable. Freshly shredded cheddar cheese sprinkled on top melts slightly from the heat, offering rich sharpness. Sliced green onions lend a fresh crunch and pop of color, while a dollop of sour cream adds cooling creaminess that balances those warm spices perfectly.
Side Dishes
Pairing sides can elevate your meal. Consider a simple Mexican rice or warm refried beans for a comforting, hearty plate. A crisp green salad with a tangy vinaigrette offers a refreshing contrast to the rich chimichangas. Grilled corn on the cob or a zesty avocado salad can add vibrant textures and flavors to round out the meal.
Creative Ways to Present
Want to impress guests? Cut the chimichangas diagonally to showcase the melty, cheesy filling nestled within the crispy shell. Serve them stacked on a colorful platter with bowls of sour cream and salsa artfully arranged around them. You can even set out a taco bar with extra toppings like fresh cilantro, diced tomatoes, pickled jalapeños, or shredded lettuce for a fun, interactive meal.
Make Ahead and Storage
Storing Leftovers
Leftover baked chicken chimichangas can be stored in an airtight container in the refrigerator for up to 3 days. Keep the garnishes like sour cream and salsa separate until serving to maintain their freshness and texture.
Freezing
These chimichangas freeze beautifully. Wrap each one tightly in plastic wrap and place them in a freezer-safe bag or container. They can be frozen for up to 2 months, making them an excellent make-ahead option for quick meals later on.
Reheating
To reheat, place the chimichangas on a baking sheet and warm in a 350°F oven for about 10-15 minutes. This method helps them regain their crispiness without drying out. Avoid microwaving if you want to keep that perfect crunch.
FAQs
Can I use a different type of cheese?
Absolutely! While Pepperjack provides a nice spicy kick, you can swap it with Monterey Jack, cheddar, or even a Mexican cheese blend. Just pick something that melts well and suits your flavor preferences.
Do I have to use cooked chicken?
Yes, cooked chicken works best here since the baking time is short. You can use rotisserie chicken, leftover roast chicken, or cook chicken breasts ahead of time for shredding. Cooking raw chicken inside the chimichangas may result in uneven cooking.
Can I make these gluten-free?
Definitely. Just substitute the flour tortillas with your favorite gluten-free tortillas. The rest of the recipe stays exactly the same and tastes just as delicious.
Is there a way to make these spicier?
Yes! You can add finely chopped jalapeños or sprinkle extra chili powder into the cheese mixture. Alternatively, serve with a spicy salsa or hot sauce for added heat.
Can these be made ahead of time and baked later?
Yes, you can assemble the chimichangas, wrap them individually, and refrigerate them for up to 24 hours before baking. Just bake them straight from the fridge, adding a few extra minutes if needed to ensure they heat through and get crispy.
Final Thoughts
If you’re looking to enjoy comforting Mexican-inspired flavors with a fraction of the fuss, this Baked Chicken Chimichangas: Easy and Delicious Recipe is the perfect answer. Crispy on the outside and decadently creamy inside, they’ll become your go-to for weeknight dinners or casual gatherings. Give them a try and watch how quickly they disappear from the table!
Print
Baked Chicken Chimichangas: Easy and Delicious Recipe
- Prep Time: 10 minutes
- Cook Time: 30 minutes
- Total Time: 40 minutes
- Yield: 8 servings
- Category: Main Course
- Method: Baking
- Cuisine: Tex-Mex
Description
These Baked Chicken Chimichangas are a mouthwatering and easy-to-make Tex-Mex favorite. Filled with a creamy blend of cream cheese, Pepperjack cheese, taco seasoning, and shredded chicken, then baked until golden and crispy, they make a perfect weeknight dinner or party appetizer. Served with classic toppings like shredded cheddar, green onions, sour cream, and salsa, these chimichangas deliver all the flavor without any frying.
Ingredients
Filling
- 8 oz package cream cheese, softened
- 8 oz shredded Pepperjack cheese
- 1 1/2 tbsp taco seasoning
- 1 lb cooked chicken, shredded
Assembly
- 8 flour tortillas
- Cooking spray
Garnishes & Serving
- Shredded cheddar cheese (for garnish)
- Green onions, sliced (for garnish)
- Sour cream (for serving)
- Salsa (for serving)
Instructions
- Mix the Cheeses and Seasoning: In a medium bowl, stir together the softened cream cheese, shredded Pepperjack cheese, and taco seasoning until you have a smooth, well combined mixture.
- Add Chicken: Fold the shredded cooked chicken into the cheese mixture, ensuring it is evenly mixed so every bite is full of flavor.
- Fill and Roll: Lay the flour tortillas flat and evenly divide the chicken mixture among them. Place the filling in the center, tuck in the sides, and roll each tortilla tightly into a chimichanga shape.
- Bake: Preheat your oven to 350°F (175°C). Lightly spray a 9×13-inch baking dish with cooking spray and place each rolled chimichanga seam side down in the dish. Spray the tops with cooking spray as well. Bake for 15 minutes, then carefully flip each chimichanga over and bake for an additional 15 minutes or until they are golden brown and crispy.
- Serve: Once baked, remove the chimichangas from the oven. Garnish with shredded cheddar cheese and sliced green onions. Serve hot with sour cream and salsa on the side for dipping.
Notes
- You can use rotisserie chicken or leftover cooked chicken for convenience.
- If you prefer, swap flour tortillas for gluten-free tortillas to accommodate dietary needs.
- For added heat, sprinkle some chopped jalapeños inside the filling or on top before baking.
- Make sure the cream cheese is softened to make mixing easier.
- To make this recipe vegetarian, substitute the chicken with beans or sautéed vegetables.

