
“`html
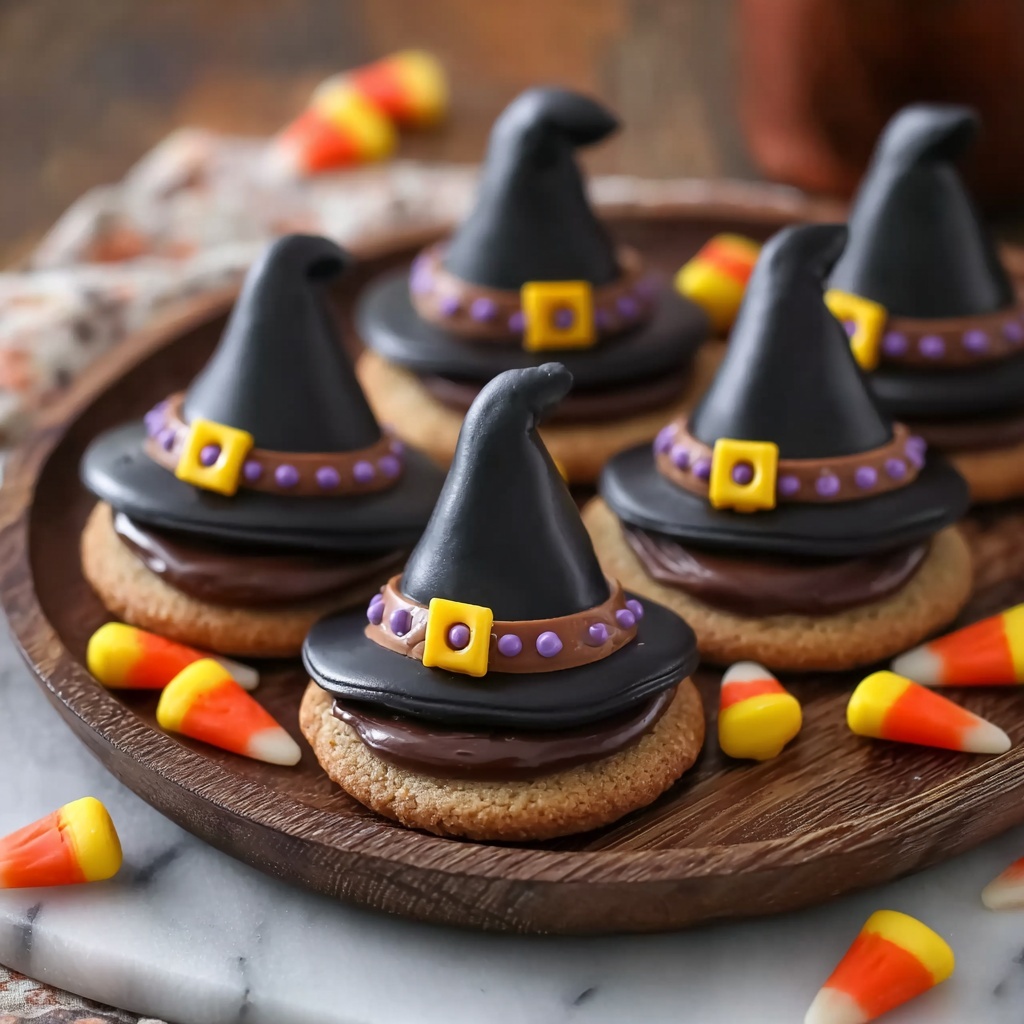
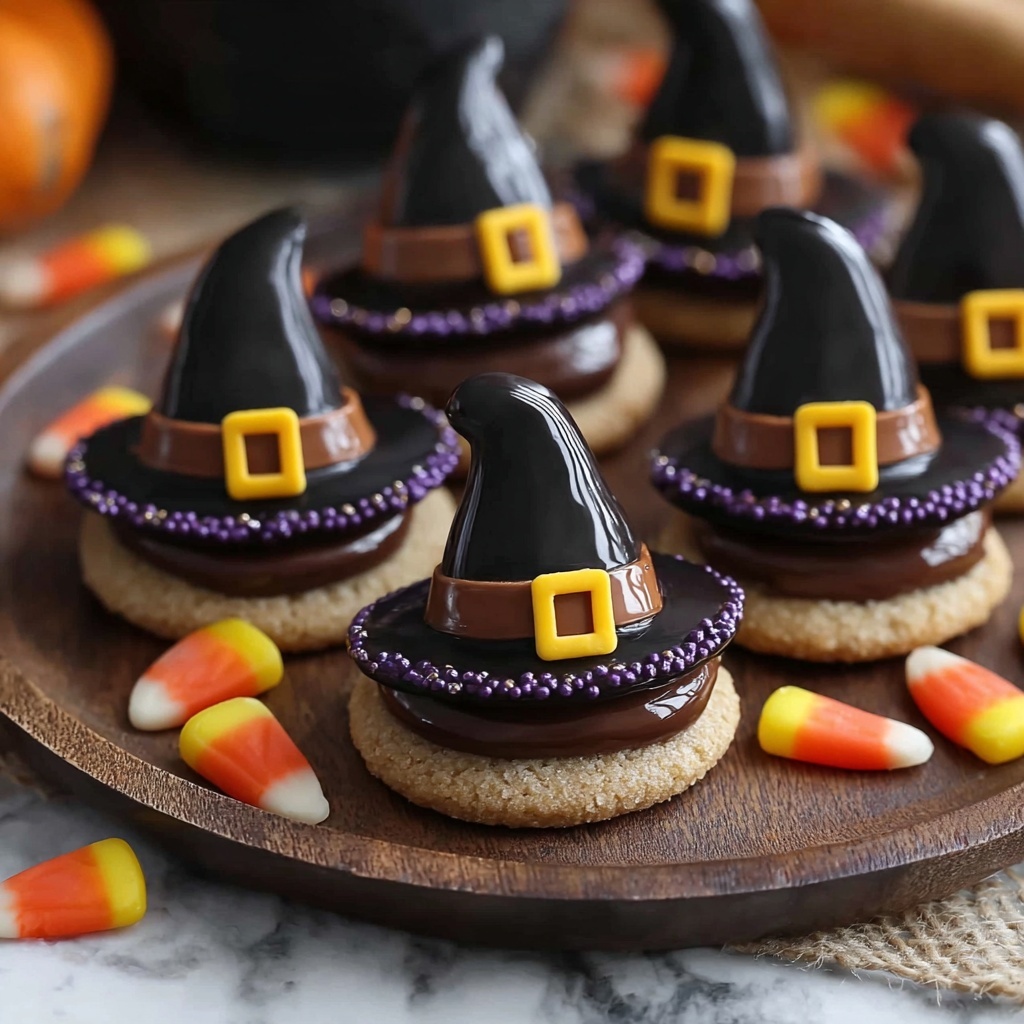
If there’s one festive treat that brings both a smile and a touch of magic to any gathering, it’s these charming Witch Hat Cookies. This Witch Hat Cookies Recipe transforms simple ingredients into adorable, chocolatey cones that look almost too good to eat. Each cookie is a delightful combination of tender cocoa-infused dough, rich icing, and a pop of colorful candy that resembles the perfect buckle on a witch’s hat. Whether you’re baking for Halloween or just want a whimsical dessert, these cookies are bound to enchant everyone around the table.
Ingredients You’ll Need
Every ingredient in this Witch Hat Cookies Recipe plays a starring role in crafting the perfect balance of flavor, texture, and that classic chocolatey hue. These essentials come together easily but deliver an irresistibly soft and rich cookie that’s sure to impress.
- 2 cups all-purpose flour: Provides the sturdy yet tender structure for the cookies.
- 1/2 cup unsweetened cocoa powder: Adds deep chocolate flavor and dark color that evoke spooky vibes.
- 1 teaspoon baking powder: Helps the cookies rise lightly for just the right fluffiness.
- 1/2 teaspoon baking soda: Works with the other leaveners to create a soft crumb.
- 1/4 teaspoon salt: Balances sweetness and enhances all the flavors.
- 1/2 cup unsalted butter, softened: Brings richness and moisture for a melt-in-your-mouth texture.
- 1 cup granulated sugar: Sweetens the dough evenly without overpowering.
- 1 large egg: Binds ingredients and gives structure to the dough.
- 1 teaspoon vanilla extract: Adds warm, aromatic depth that complements chocolate perfectly.
- 1/2 cup chocolate icing: For decorating the hat’s tip with luscious chocolate.
- 1/2 cup black icing: Used to create the hat’s base band with bold contrast.
- Colorful candy (such as M&M’s or chocolate-covered candies): Serves as the cute buckle for an added pop of color and fun.
- Optional: powdered sugar for dusting: Gives a whimsical, lightly frosted finish.
How to Make Witch Hat Cookies Recipe
Step 1: Mixing Dry Ingredients
Start by gathering all your ingredients so nothing slows you down. Preheat your oven to 350°F (175°C). In a medium bowl, whisk together the all-purpose flour, unsweetened cocoa powder, baking powder, baking soda, and salt. This step ensures the dry elements are evenly distributed and ready to mingle with the wet ingredients seamlessly.
Step 2: Creaming Butter and Sugar
In a large bowl, cream the softened unsalted butter and granulated sugar until light and fluffy. This is where air gets whipped into the mixture, setting the stage for tender, melt-in-your-mouth cookies. Then, beat in the egg and vanilla extract until everything is perfectly combined.
Step 3: Combining Wet and Dry Ingredients
Next, gradually add the dry mixture to the wet one, stirring gently until just combined. The dough should feel soft but sturdy enough to shape. Overmixing at this stage can make the cookies tough, so a light hand is key.
Step 4: Shaping the Witch Hats
Here’s where the fun really begins! Shape the dough into cone-like forms resembling witch hats and place them spaced apart on a baking sheet lined with parchment paper. Each hat should be distinct and tall enough to hold its shape after baking.
Step 5: Baking to Perfection
Bake the hats for about 10 to 12 minutes. You want the edges to be firm, offering a gentle crispness, while the centers remain soft and tender. Once out of the oven, allow the cookies to cool on the baking sheet for a few minutes before transferring them to a wire rack to cool completely.
Step 6: Decorating Your Witch Hats
Decorate the cooled cookies using chocolate icing at the pointed top to mimic the tip of a witch hat. Then pipe black icing around the base of the hat to create the signature band. Press a colorful candy buckle into the icing for a playful, eye-catching detail that completes each cookie’s look.
How to Serve Witch Hat Cookies Recipe
Garnishes
For a magical finishing touch, lightly dust the assembled witch hat cookies with powdered sugar. It adds a delicate frost-like effect, evoking an enchanted Halloween night. You could also sprinkle edible glitter or tiny stars for an extra whimsical flair.
Side Dishes
Pairing these Witch Hat Cookies with a warm cup of spiced chai, hot chocolate, or even a tart cranberry punch creates a cozy complementary experience. The rich chocolate flavor of the cookies balances beautifully with both creamy and fruity drinks.
Creative Ways to Present
Display your Witch Hat Cookies Recipe wonders on a tiered cake stand for a striking centerpiece at any party. Alternatively, nestle them among autumn leaves or mini pumpkins for a festive vibe. You could even place them in individual clear bags tied with orange and black ribbons—perfect for giving away as delightful party favors.
Make Ahead and Storage
Storing Leftovers
Keep any uneaten Witch Hat Cookies in an airtight container at room temperature to maintain their softness and flavor. They should stay delicious for up to 4 days, making them an ideal treat to prepare ahead of time for your celebrations.
Freezing
If you want to save these cookies longer, you can freeze them both before and after baking. Wrap the shaped dough tightly in plastic wrap and freeze for up to 2 months. For baked cookies, store them in a freezer-safe container, separating layers with parchment paper to avoid sticking.
Reheating
To enjoy your Witch Hat Cookies just like fresh-baked, warm them gently in a low oven at 300°F for 5 minutes or so. This revives the softness beautifully without drying them out—perfect for that cozy moment when you want a freshly baked treat.
FAQs
Can I use store-bought icing for this recipe?
Absolutely! Store-bought icings are convenient and work wonderfully for decorating the witch hats. Just make sure they’re thick enough to hold the candy buckle in place.
What if I don’t have cocoa powder? Can I still make these cookies?
Cocoa powder is key to getting the witch hats their signature chocolate color and flavor. Without it, the cookies won’t have the same depth or look, but you could experiment with adding a small amount of melted chocolate instead.
How do I shape the dough cones neatly?
Using your hands or a small cookie scoop, roll the dough into balls first. Then gently taper one side into a point to mimic a hat shape. Placing cones on parchment helps them keep their form during baking.
Can I use different candies for the buckle decoration?
Yes! Feel free to get creative with your candies. Tiny colored chocolates, edible pearls, or even small pretzel pieces can add a fun buckle variation that fits your style and taste.
Are these cookies suitable for kids to make together with adults?
Definitely! This Witch Hat Cookies Recipe is simple enough for kids to help with shaping and decorating, making it a perfect family-friendly baking activity, especially around Halloween.
Final Thoughts
If you’re looking for a festive, fun, and utterly delicious baking project, this Witch Hat Cookies Recipe is just the ticket. From the tender cocoa dough to the playful decorations, every step offers a joyful connection to the season’s spirit. Gather your ingredients, roll up your sleeves, and create a batch of these whimsical witch hats that are guaranteed to cast a sweet spell on everyone who tries them!
“`
Print
Witch Hat Cookies Recipe
- Prep Time: 15 minutes
- Cook Time: 12 minutes
- Total Time: 42 minutes
- Yield: 24 servings
- Category: Dessert
- Method: Baking
- Cuisine: American
Description
These Witch Hat Cookies are a fun and festive treat perfect for Halloween or any spooky-themed celebration. Made with rich cocoa and topped with colorful candies, these cone-shaped cookies resemble classic witch hats and are sure to delight kids and adults alike.
Ingredients
Dry Ingredients
- 2 cups all-purpose flour
- 1/2 cup unsweetened cocoa powder
- 1 teaspoon baking powder
- 1/2 teaspoon baking soda
- 1/4 teaspoon salt
Wet Ingredients
- 1/2 cup unsalted butter, softened
- 1 cup granulated sugar
- 1 large egg
- 1 teaspoon vanilla extract
Decorations
- 1/2 cup chocolate icing (store-bought or homemade)
- 1/2 cup black icing (store-bought or homemade)
- Colorful candy (such as M&M’s or chocolate-covered candies) for buckles
- Optional: powdered sugar for dusting
Instructions
- Gather Ingredients: Assemble all ingredients to ensure everything is ready for baking.
- Preheat Oven and Mix Dry Ingredients: Preheat your oven to 350°F (175°C). In a medium bowl, whisk together the all-purpose flour, unsweetened cocoa powder, baking powder, baking soda, and salt to evenly distribute the leavening agents and cocoa.
- Cream Butter and Sugar: In a large mixing bowl, cream the softened unsalted butter and granulated sugar together until the mixture is light and fluffy, which will help create a tender texture in the cookies. Then add the large egg and vanilla extract, mixing until fully combined.
- Combine Wet and Dry Ingredients: Gradually add the dry ingredient mixture to the wet ingredients, stirring gently until just combined to avoid overmixing, which can toughen the cookies.
- Shape the Dough into Witch Hats: Form the cookie dough into cone shapes that resemble witch hats. Place each shaped dough piece on a baking sheet lined with parchment paper, spacing them evenly to allow for expansion during baking.
- Bake the Cookies: Bake the cookies in the preheated oven for 10-12 minutes, watching for the edges to become firm while the centers remain soft. Afterwards, remove from the oven and allow the cookies to cool on the baking sheet for a few minutes before transferring them to a wire rack to cool completely.
- Decorate: Once the cookies have cooled, use chocolate icing to decorate the tip of each witch hat and black icing around the base. Press a colorful candy onto the black icing to resemble a buckle for the perfect finishing touch.
- Serve and Optional Dusting: Arrange the decorated witch hat cookies on a serving platter. Optionally, dust with powdered sugar for an extra festive presentation. Enjoy!
Notes
- Be careful not to overbake; the cookies should have firm edges but soft centers for the best texture.
- If you prefer, homemade icing can be used instead of store-bought for a customized taste and decoration.
- These cookies can be stored in an airtight container at room temperature for up to 3 days.
- For a gluten-free version, substitute the all-purpose flour with a gluten-free flour blend with a 1-to-1 ratio.
- Use a piping bag for more precise icing application when decorating.

