
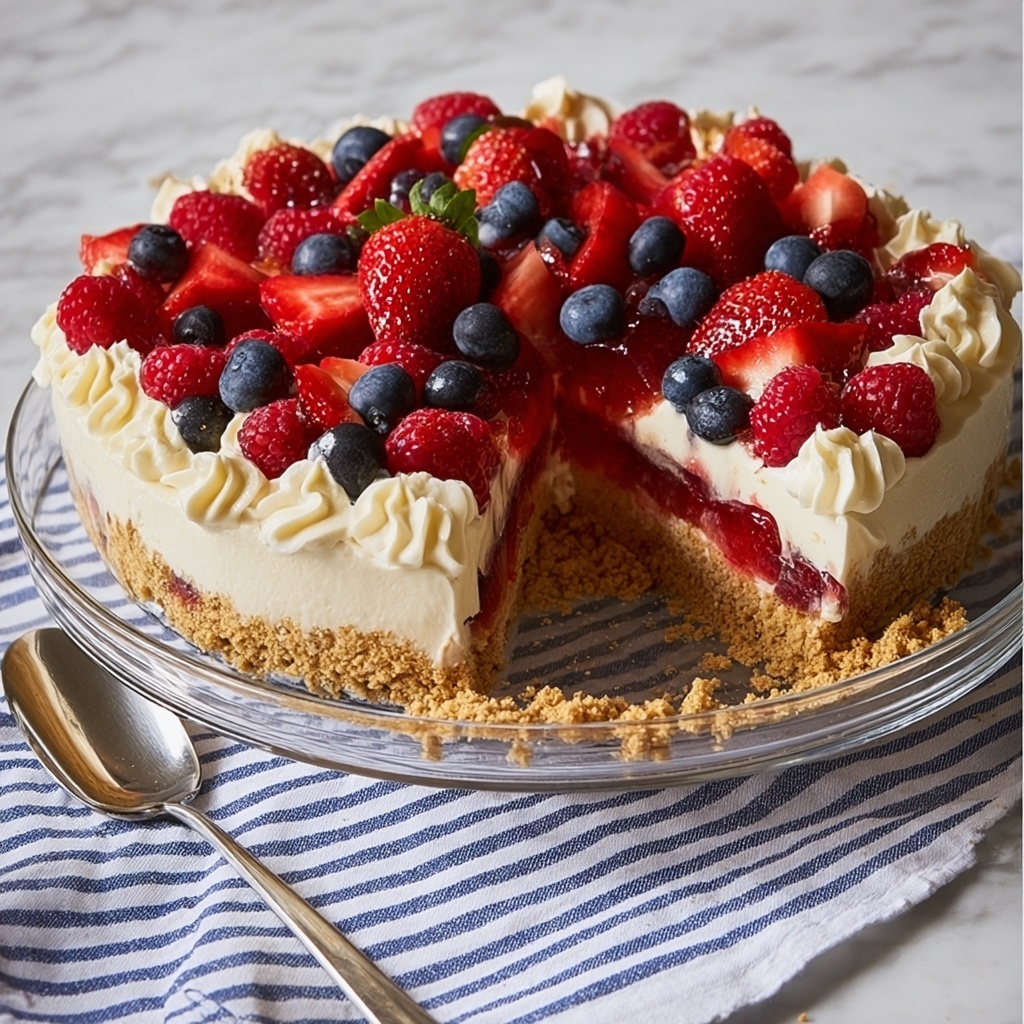
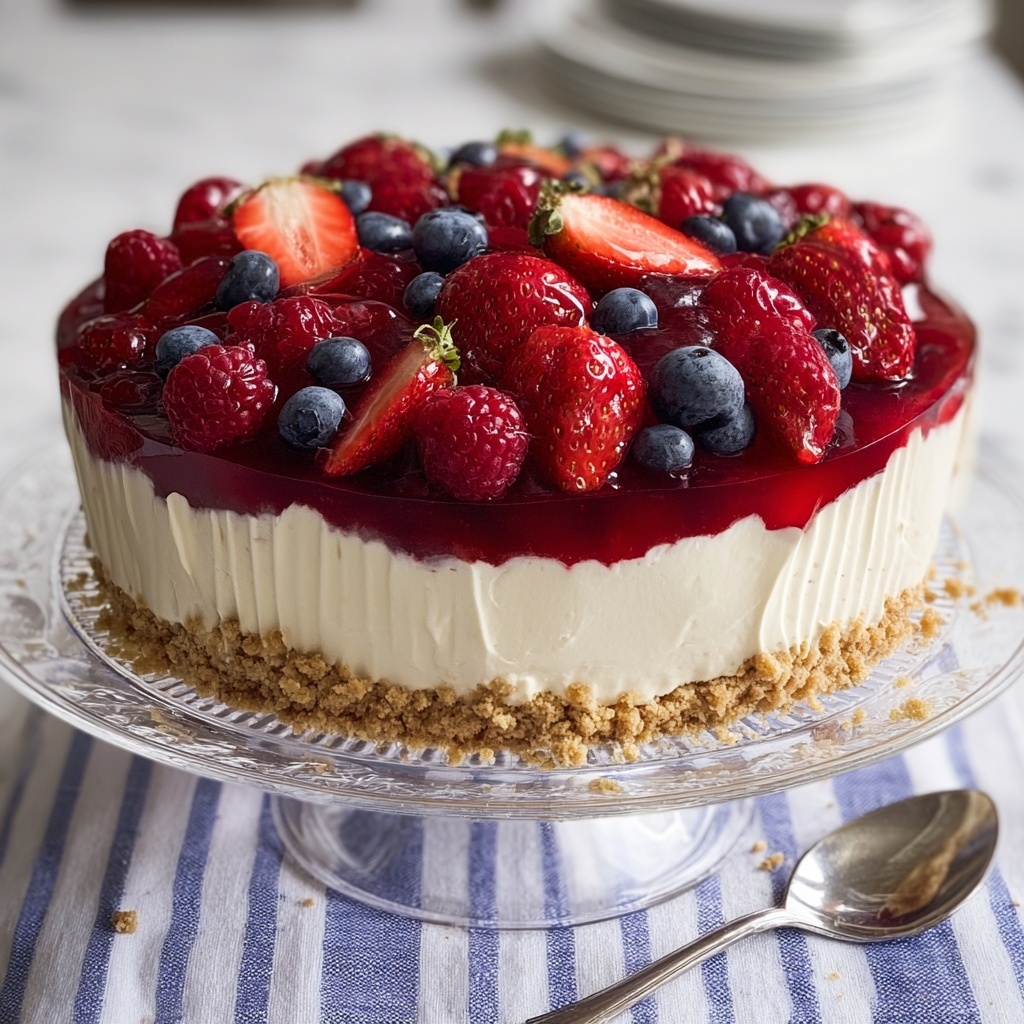
If you’re looking for a stunning, crowd-pleasing dessert that’s as delightful to make as it is to eat, you simply must try the No-Bake Cheesecake Flag Cake Recipe. This patriotic treat combines a creamy, luscious cheesecake filling with a buttery, chocolatey crust, then finishes with fresh strawberries and blueberries arranged to mimic the stars and stripes of the American flag. It’s a showstopper perfect for summer gatherings, Fourth of July celebrations, or any occasion that calls for a little festive flair. Plus, it’s incredibly easy to assemble, requiring no oven time and delivering big flavor with every bite.
Ingredients You’ll Need
This No-Bake Cheesecake Flag Cake Recipe only calls for simple, wholesome ingredients that come together beautifully to create a rich, smooth cheesecake base and a flavorful crust. Each element plays a crucial role, from the tangy brightness of lemon to the fresh pop of berries on top.
- 1 ½ cups finely crushed graham cracker crumbs: The crunchy foundation that adds texture and a buttery flavor to the crust.
- ¼ cup white sugar: Sweetens the crust just enough to balance the cocoa and buttery notes.
- 2 tablespoons unsweetened cocoa powder: Brings a subtle chocolate depth to the crust, making it irresistible.
- 6 tablespoons butter, melted: Binds the crust ingredients together and adds richness.
- 1 cup cream cheese at room temperature: The creamy backbone of the cheesecake filling that gives that classic tang.
- 1 cup mascarpone cheese at room temperature: Adds an indulgent, luscious texture to the filling.
- 2 teaspoons grated lemon zest: Infuses fresh, citrus brightness that cuts through the richness.
- 2 teaspoons lemon juice: Enhances the tartness and freshness of the cheesecake filling.
- 1 teaspoon vanilla extract: Provides warm, aromatic depth and rounds out the flavors.
- ⅓ cup white sugar: Sweetens the filling perfectly without overpowering the delicate balance.
- 1 ¼ cups cold heavy whipping cream: Whipped to soft peaks to give the cheesecake its airy, light texture.
- 20 large fresh strawberries, hulled and halved lengthwise: The vibrant red stripes of the flag, adding both color and juicy sweetness.
- 24 large fresh blueberries: The “stars” section of the flag made fresh and bursting with flavor.
How to Make No-Bake Cheesecake Flag Cake Recipe
Step 1: Prepare the Chocolatey Graham Cracker Crust
Start by mixing the finely crushed graham cracker crumbs, sugar, and cocoa powder in a bowl. Then add the melted butter and stir until the mixture looks crumbly but holds together when pressed. This combination ensures your crust is not only flavorful but has a gently fudgy texture that’s a perfect base for the cheesecake.
Step 2: Form and Chill the Crust
Press the crust mixture evenly into the bottom of a 9×11-inch baking dish, making sure it’s smooth and firmly pressed down. Cover it tightly with plastic wrap and pop it in the fridge for about 30 minutes to set. Chilling keeps the crust crunchy and helps it hold up when you spread the filling on top.
Step 3: Make the Creamy Cheesecake Filling
In a mixing bowl, beat together the cream cheese and mascarpone until smooth and fully combined—that luscious, creamy base we’re aiming for. Add the grated lemon zest, fresh lemon juice, and vanilla extract, stirring gently to incorporate those zesty, fragrant notes that brighten the cheesecake.
Step 4: Whip the Cream and Fold into Filling
Using a chilled bowl, whisk the heavy cream with sugar until it forms soft, fluffy peaks. This step is key to the filling’s airy texture. Carefully fold the whipped cream into the cream cheese mixture, taking care not to deflate the lightness. The result is a perfectly fluffy and smooth cheesecake filling that melts in your mouth.
Step 5: Assemble the Cake Base and Chill Again
Spoon the creamy filling over the chilled crust and spread evenly with a spatula. Gently tap the pan on your countertop several times to level the filling and remove any air bubbles. Cover the dish tightly again and refrigerate for at least three hours—or until the cheesecake is fully set and chilled.
Step 6: Decorate to Create the Flag Design
Begin with the strawberries: place halved berries along the bottom edge in a tidy horizontal line, tops pointed to the right. Continue to add more horizontal stripes of strawberries each about three quarters of an inch apart, covering the entire length except leaving a square space in the top left corner. This leftover area is perfect for the blueberry “stars.”
Step 7: Fill the Blueberry Square with Fresh Berries
Fill the reserved upper-left square with blueberries, positioning each berry with the blossom end facing upward for a neat, polished look. Pack the berries tightly together to mimic the dense cluster of stars and give a burst of color and freshness that completes the iconic flag motif.
Step 8: Slice and Serve
Once decorated, cut the cheesecake into neat individual squares. This makes for gorgeous presentation pieces that showcase your handiwork and ensures everyone gets a perfect piece of that creamy, tangy dessert with fruity bursts in every bite.
How to Serve No-Bake Cheesecake Flag Cake Recipe
Garnishes
While the fresh strawberries and blueberries provide a beautiful natural garnish, you can amp up the celebration by adding a sprinkle of edible glitter or a few fresh mint leaves around the edges. A light dusting of powdered sugar over the fruit right before serving adds a snow-kissed sparkle that’s simply magical.
Side Dishes
This cheesecake pairs wonderfully with light, refreshing sides like a citrusy fruit salad or a scoop of homemade vanilla ice cream. Freshly brewed coffee or a chilled sparkling rosé can also elevate this dessert experience and make your gathering all the more special.
Creative Ways to Present
For an extra festive touch, serve the cake on a bright red or blue platter to complement the cake’s colors. You could also turn each square into a mini dessert by topping with whipped cream rosettes or a tiny fresh berry on every piece. Perfect for picnics, BBQs, or summer parties!
Make Ahead and Storage
Storing Leftovers
Keep any leftovers covered tightly with plastic wrap or in an airtight container in the refrigerator. The cake will stay fresh and creamy for up to 3 days. Just be sure to store it chilled, as the filling is delicate and best enjoyed cold.
Freezing
If you want to enjoy this No-Bake Cheesecake Flag Cake Recipe later, it freezes well. Wrap it securely in plastic wrap and then foil, placing it in a freezer-safe container. Freeze for up to 1 month. When ready, thaw overnight in the fridge for best texture and flavor.
Reheating
Since this is a no-bake cheesecake, it’s meant to be served cold. Avoid reheating to preserve that smooth, creamy texture. Let it come to room temperature for about 10-15 minutes before serving if you prefer it less chilled.
FAQs
Can I use regular cream cheese instead of mascarpone?
Yes! You can substitute mascarpone with more cream cheese, but mascarpone adds an extra layer of richness and silkiness. If you only have cream cheese, your cheesecake will still be delicious.
How do I make sure the crust stays crunchy?
Press the crust firmly when forming it and chill it well in the refrigerator before adding the filling. This helps it set solidly and stay crisp longer once the creamy filling is on top.
Can I prepare this cake the day before serving?
Absolutely! In fact, making it a day ahead gives the flavors time to meld and the cake a chance to fully set. Just add the fresh fruit decoration as close to serving time as possible for the best presentation.
What other fruits can I use if I don’t have strawberries or blueberries?
While strawberries and blueberries are perfect for the flag design, you can substitute with raspberries, blackberries, or red and purple grapes. Just keep the colors vibrant to maintain the patriotic look.
Is there a way to make this cheesecake dairy-free?
For a dairy-free version, you could experiment with plant-based cream cheese and non-dairy whipped toppings, but the texture and flavor will differ. The original recipe shines with its creamy cheeses.
Final Thoughts
This No-Bake Cheesecake Flag Cake Recipe is the kind of dessert that brings everyone together, whether it’s for a special celebration or a fun weekend treat. It’s easy enough for beginners, yet impressive enough to wow your guests. The combination of creamy filling, crunchy crust, and fresh berries is simply irresistible. Give it a whirl—you might find it becoming your go-to dessert all summer long!
Print
No-Bake Cheesecake Flag Cake Recipe
- Prep Time: 20 minutes
- Cook Time: 0 minutes
- Total Time: 3 hours 20 minutes
- Yield: 9 servings
- Category: Dessert
- Method: No-Cook
- Cuisine: American
- Diet: Vegetarian
Description
This No-Bake Cheesecake Flag Cake is a patriotic dessert featuring a rich, creamy cheesecake filling atop a chocolate graham cracker crust, decorated with fresh strawberries and blueberries arranged to resemble the American flag. Perfect for celebrations, this easy-to-make dessert requires no baking and is chilled until set, blending the tangy cream cheese and mascarpone with a fluffy whipped cream topping.
Ingredients
Crust
- 1 ½ cups finely crushed graham cracker crumbs
- ¼ cup white sugar
- 2 tablespoons unsweetened cocoa powder
- 6 tablespoons butter, melted
Filling
- 1 cup cream cheese at room temperature
- 1 cup mascarpone cheese at room temperature
- 2 teaspoons grated lemon zest
- 2 teaspoons lemon juice
- 1 teaspoon vanilla extract
- ⅓ cup white sugar
- 1 ¼ cups cold heavy whipping cream
Topping
- 20 large fresh strawberries, hulled and halved lengthwise, or as needed
- 24 large fresh blueberries, or as needed
Instructions
- Prepare the Crust: In a bowl, combine graham cracker crumbs, 1/4 cup sugar, cocoa powder, and melted butter until the mixture is crumbly and well blended.
- Set the Crust: Transfer the crust mixture to a 9×11-inch baking dish. Press it evenly across the bottom to form a smooth layer. Cover with plastic wrap and refrigerate for about 30 minutes to firm up.
- Mix the Cream Cheese Filling: In a separate bowl, thoroughly combine the cream cheese and mascarpone cheese. Stir in grated lemon zest, lemon juice, and vanilla extract until smooth.
- Whip the Cream: In another chilled bowl, whisk 1/3 cup sugar into the cold heavy whipping cream until soft peaks form. Gently fold the whipped cream into the cream cheese mixture, producing a soft, fluffy filling.
- Assemble the Cheesecake: Spread the filling evenly over the chilled crust. Tap the pan several times on the counter to settle the crust and filling. Cover tightly with plastic wrap and refrigerate for at least 3 hours or until fully chilled and set.
- Decorate with Strawberries: Starting along the bottom long edge of the cake, lay strawberry halves in a horizontal line with the pointed ends facing right. Continue creating additional horizontal strawberry stripes across the cake as described, leaving a square space at the top left for the blueberries.
- Decorate with Blueberries: Fill the reserved square space in the upper left corner with blueberries arranged in rows, blossom ends pointing upward, to mimic the stars field on the flag.
- Serve: Cut the cheesecake into squares to serve your beautiful No-Bake Cheesecake Flag Cake.
Notes
- For best results, ensure cream cheese and mascarpone are at room temperature before mixing.
- Use chilled bowls to whip cream more efficiently.
- Adjust the number of strawberries and blueberries as needed to fit your baking dish and create the flag design.
- Allow cheesecake to chill thoroughly to ensure it sets properly before decorating or cutting.
- This recipe is best served chilled and eaten the same day but can be stored covered in the refrigerator for up to 2 days.


