
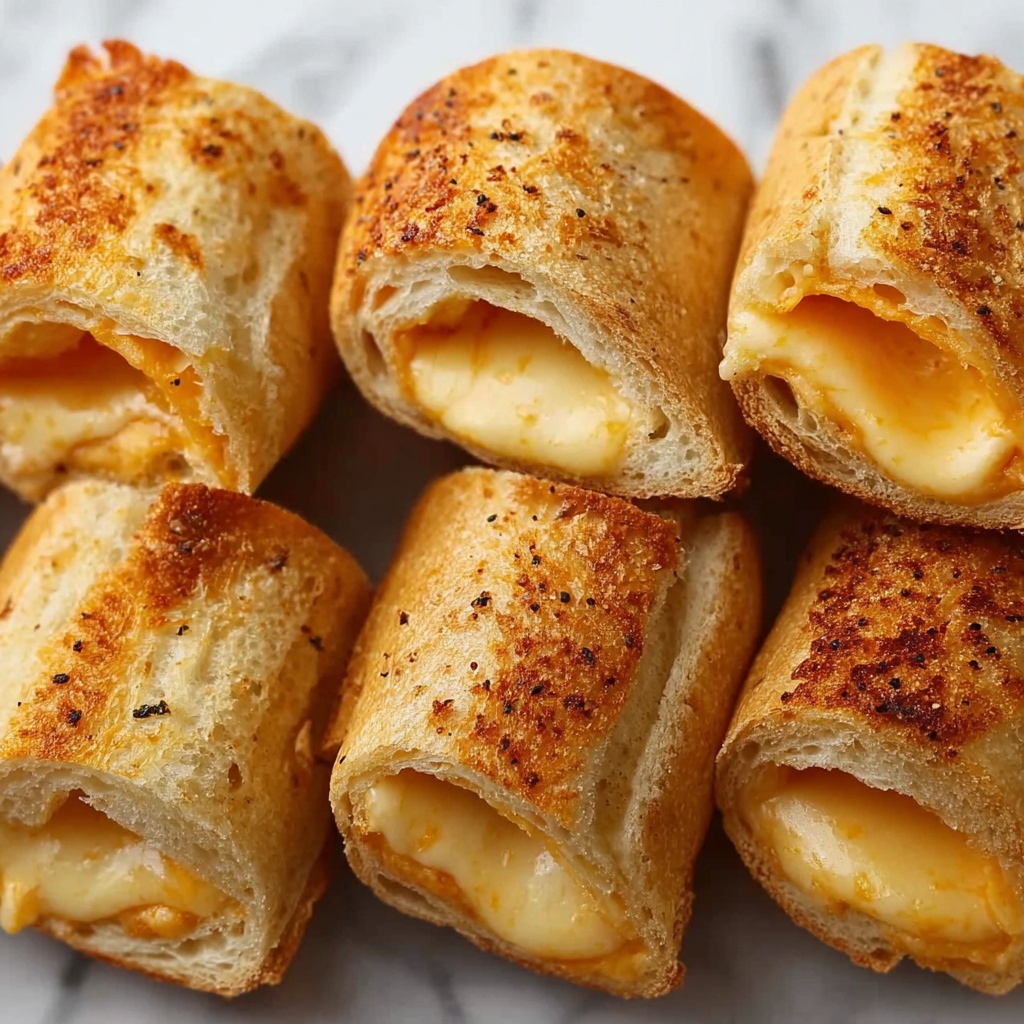
If you’re craving a nostalgic comfort food twist that’s quick, fun, and utterly delicious, then this Grilled Cheese Roll-Ups Recipe is about to become your new best friend in the kitchen. Imagine taking classic grilled cheese flavors and wrapping them up in a neat, crispy little bundle that’s perfect for dipping, sharing, or just sneaking a few whenever the snack attack hits. With melty cheese, buttery golden bread, and a hint of herbs if you like, these roll-ups are easy to make, irresistibly tasty, and kid-approved. They’re the snack upgrade you didn’t know you needed until now!
Ingredients You’ll Need
Simple, everyday ingredients come together to create the magic in this Grilled Cheese Roll-Ups Recipe. Each element plays a starring role, whether it’s the creamy cheese, soft bread, or rich butter that ensures gorgeous browning and flavor.
- Soft white sandwich bread with crusts removed: Makes rolling easy without cracking and forms the perfect golden exterior.
- Cheddar cheese or American cheese slices: Classic melty cheese choice that delivers gooey, delicious cheesy goodness inside.
- Butter, melted: Adds a rich, flavorful browning coat that crisps up the bread beautifully during cooking.
- Garlic powder (optional): A subtle savory kick that enhances the buttery coating perfectly.
- Dried parsley (optional): Adds a pop of color and fresh herbal notes that make each bite feel extra special.
How to Make Grilled Cheese Roll-Ups Recipe
Step 1: Flatten the Bread
Grab a rolling pin and gently press down each slice of bread until it is thin and flexible. This step is key because it allows the bread to roll easily without cracking or tearing, setting you up for that signature neat roll-up look.
Step 2: Add the Cheese and Roll
Place one slice of your cheese right onto each flattened bread slice, then carefully roll it up tightly into a compact log shape. This seals the cheese inside, ready to melt to perfection during cooking.
Step 3: Butter Up for Beautiful Browning
Lightly brush the outside of each cheese roll-up with melted butter. If you want to spice it up a little, stir the garlic powder and dried parsley into the butter first for an herby, savory touch that takes these from simple to spectacular.
Step 4: Cook to Golden Perfection
Heat a skillet over medium heat. Place the roll-ups seam side down in the pan—this helps keep them from unrolling while cooking. Let them cook for 2 to 3 minutes per side, turning occasionally, until each side is gloriously golden brown and the cheese inside has melted into a gooey delight.
Step 5: Cool and Slice
Remove the roll-ups from the skillet and give them a minute or two to cool just enough. Then slice them in half or serve whole, ready for dipping into all your favorite sauces.
How to Serve Grilled Cheese Roll-Ups Recipe

Garnishes
A sprinkle of chili flakes or a little extra dried parsley over the top adds just the right pop of color and flavor to these golden roll-ups, making them as pretty as they are tasty.
Side Dishes
Tomato soup or marinara sauce make perfect companions for dipping, elevating these roll-ups into a deliciously satisfying snack or light meal. You can’t go wrong with a fresh green salad on the side either.
Creative Ways to Present
Try stacking a pyramid of the grilled cheese roll-ups on a large platter for party snacking, or arrange them artfully with colorful veggies and dipping bowls for a fun appetizer spread that always disappears fast.
Make Ahead and Storage
Storing Leftovers
If you have any leftovers, pop them in an airtight container and refrigerate. They stay tasty for up to two days and make a quick snack or lunch box treat the next day.
Freezing
For longer storage, wrap each roll-up tightly in plastic wrap and freeze in a sealed bag. They keep well for up to one month and thaw quickly when ready to enjoy.
Reheating
Reheat refrigerated or thawed roll-ups in a skillet over medium heat or in the oven until warmed through and crispy again. Avoid microwaving if you want to keep that signature crunch.
FAQs
Can I use other types of cheese for this recipe?
Absolutely! Try mozzarella for an ooey-gooey stretch, pepper jack for a spicy kick, or even a mix of cheeses for extra flavor. Just be sure the cheese melts well.
Is there a healthier option for the bread and butter?
Yes, you can use whole wheat or multigrain bread for more fiber, and swap the butter for olive oil or a light margarine if you prefer a healthier fat option.
Can I add meat or other fillings inside the roll-ups?
Definitely! Thin slices of ham, turkey, or even cooked bacon make excellent additions, adding protein and savoriness to the classic grilled cheese roll-up.
What’s the best way to prevent the bread from cracking when rolling?
Flattening the bread with a rolling pin until it is thin and flexible is the secret. It helps the bread bend without breaking and creates that perfect roll-up shape.
Are these suitable for kids and picky eaters?
Yes! They’re a kid-friendly snack that’s simple, cheesy, and fun to eat. You can customize fillings and dips to suit their tastes, making snack time a breeze.
Final Thoughts
Once you try this easy and delightful Grilled Cheese Roll-Ups Recipe, you’ll wonder how you ever enjoyed grilled cheese without rolling it up first. It’s a playful twist on a beloved classic that’s perfect for quick snacks, kid lunches, or even casual entertaining. Dive in, experiment with your favorite cheeses and add-ins, and get ready to fall in love with this crispy, melty, buttery little treat!
Print
Grilled Cheese Roll-Ups Recipe
- Prep Time: 10 minutes
- Cook Time: 8 minutes
- Total Time: 18 minutes
- Yield: 4 servings
- Category: Snack
- Method: Stovetop
- Cuisine: American
- Diet: Vegetarian
Description
This Grilled Cheese Roll-Ups recipe offers a fun and easy twist on the classic grilled cheese sandwich. Soft white bread slices are flattened, filled with cheesy goodness, rolled tightly, and pan-fried until golden and melty. Perfect as a snack or quick meal, these roll-ups are kid-friendly and great served with dipping sauces like tomato soup or marinara.
Ingredients
Ingredients
- 8 slices soft white sandwich bread, crusts removed
- 8 slices cheddar cheese or American cheese
- 2 tablespoons butter, melted
- 1/2 teaspoon garlic powder (optional)
- 1/2 teaspoon dried parsley (optional)
Instructions
- Prepare the bread: Use a rolling pin to flatten each slice of bread until it is thin and flexible enough to roll without cracking.
- Add cheese: Place one slice of cheddar or American cheese on each flattened bread slice.
- Roll up: Roll each piece tightly into a log shape, ensuring the cheese is fully enclosed.
- Butter the outsides: Mix the garlic powder and dried parsley into the melted butter if using, then brush the outside of each roll-up lightly with the butter mixture.
- Cook the roll-ups: Heat a skillet over medium heat. Place the roll-ups seam-side down in the pan. Cook for 2 to 3 minutes, turning occasionally, until all sides are golden brown and the cheese inside is melted.
- Serve: Remove from the skillet, let cool slightly, then slice in half or serve whole with your choice of dipping sauce.
Notes
- Serve with tomato soup or marinara sauce for a delicious dipping option.
- Use soft, fresh sandwich bread for easy rolling and to avoid cracking.
- For a variation, add thin slices of ham or turkey inside before rolling.
