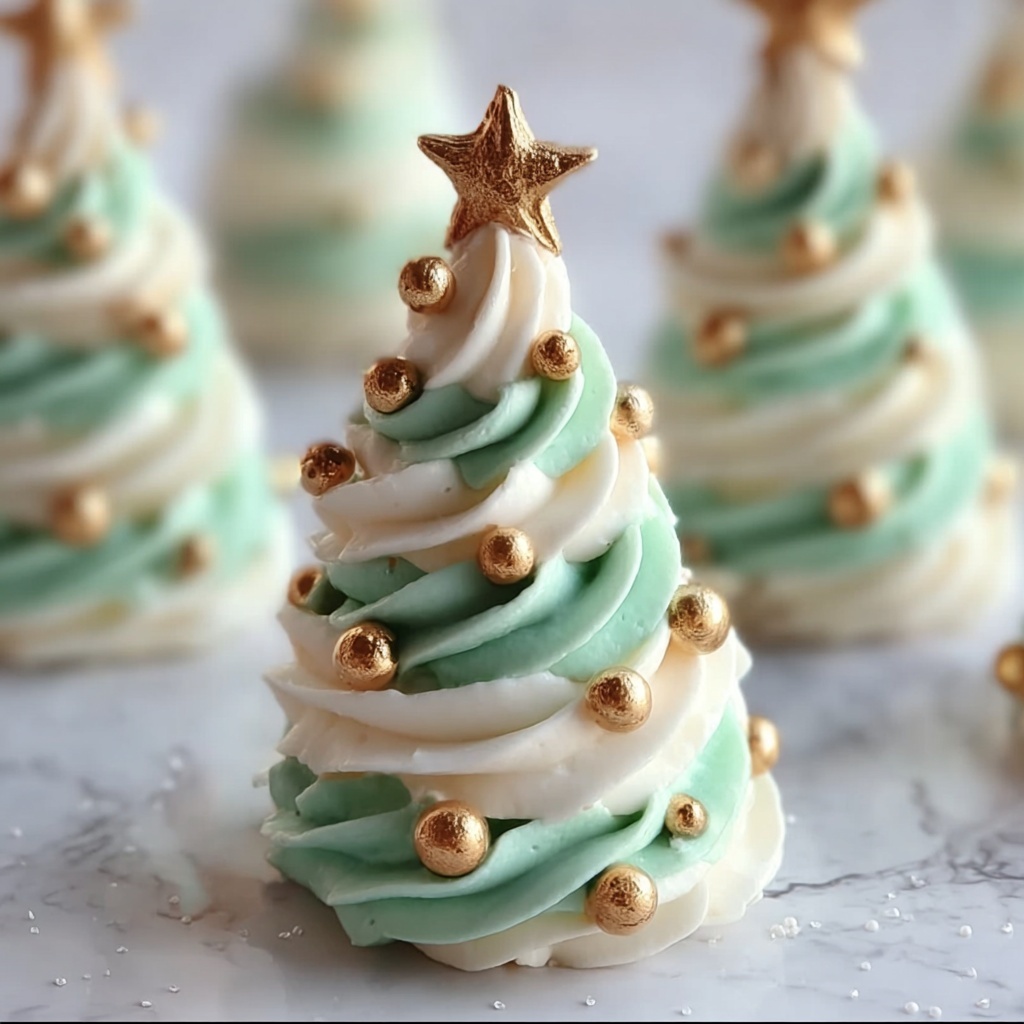
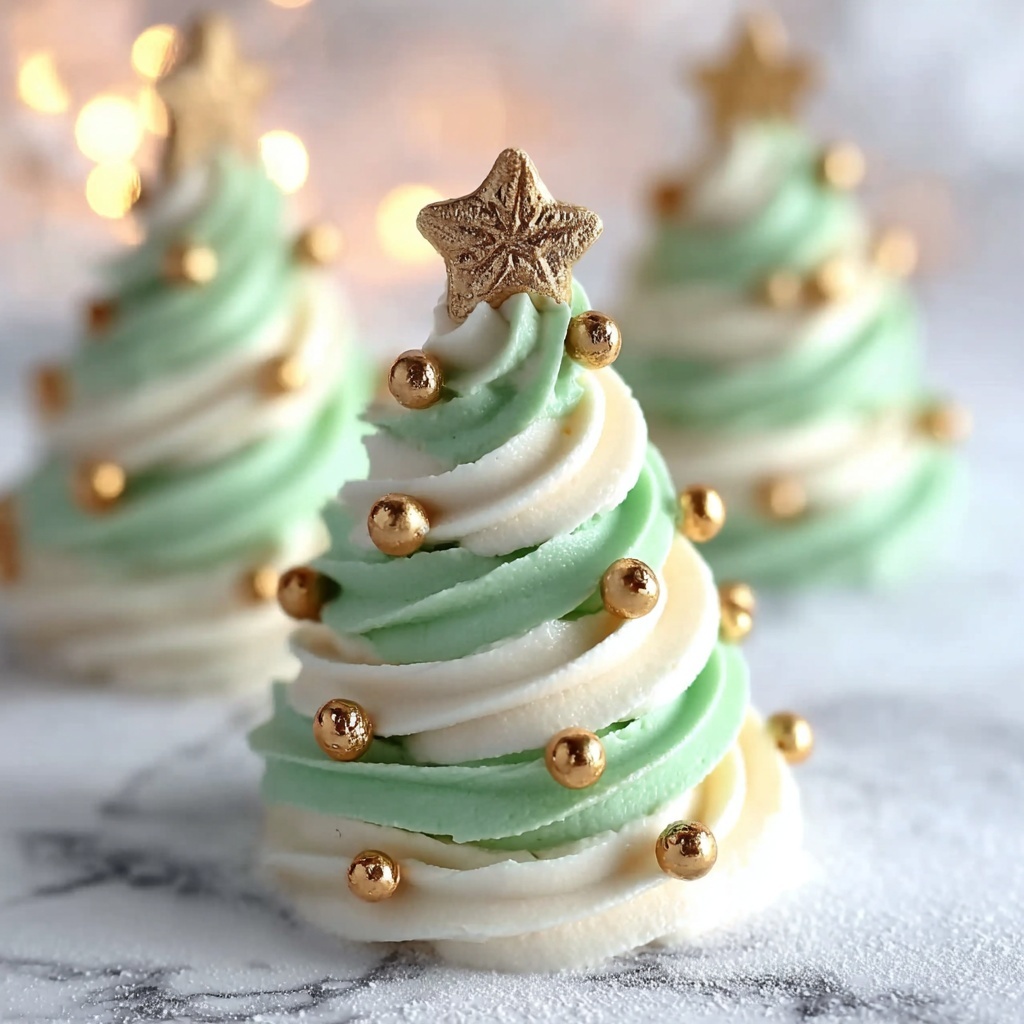
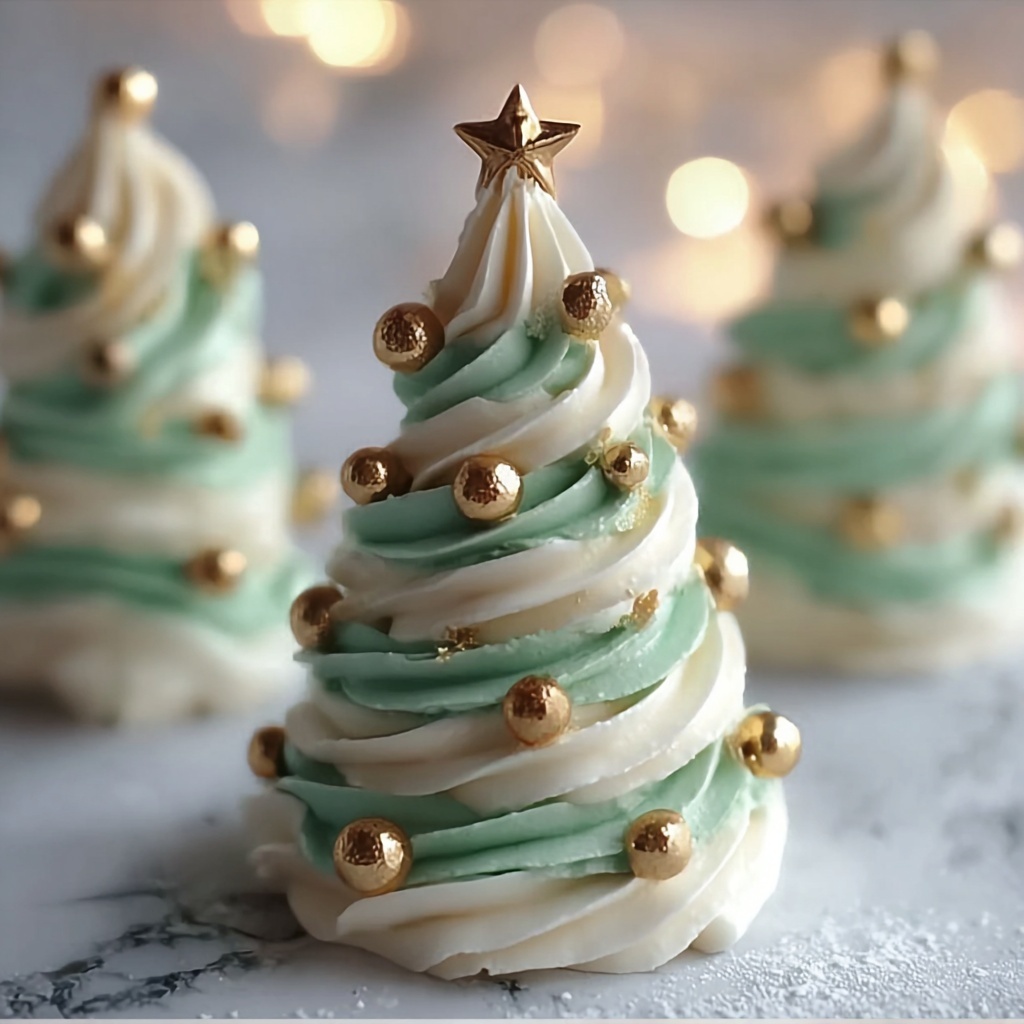
If you’re looking for a delightful, festive treat that will brighten up your holiday gathering, this Christmas Tree Meringues Recipe is an absolute game-changer. These delicate, crisp, and airy meringues shaped like charming little Christmas trees are not only stunning to look at but also wonderfully light melts-in-your-mouth treats. With just a handful of simple ingredients and a dash of festive creativity, you’ll have a batch of irresistibly sweet edible decorations guaranteed to impress your guests and fill your kitchen with holiday cheer.
Ingredients You’ll Need
The beauty of this Christmas Tree Meringues Recipe lies in its simplicity. Each ingredient plays a crucial role in creating that perfect crisp exterior and marshmallow-like center, along with the vibrant green color that makes these treats truly magical.
- 4 large Egg Whites: Make sure they’re at room temperature for maximum volume and stability when whipped.
- 1 cup Granulated Sugar: This sweetens the meringue and helps achieve that glossy, shiny finish.
- 1 teaspoon Cream of Tartar: A small addition that stabilizes the egg whites and keeps the meringue firm.
- 1 teaspoon Vanilla Extract: Adds a subtle depth of warm flavor that complements the sweetness perfectly.
- 1 teaspoon Green Gel Food Coloring: This is what turns your meringues into charming little evergreen trees.
- 1 cup Sprinkles (optional): For that extra festive flair, perfect to dot your Christmas trees like ornaments.
How to Make Christmas Tree Meringues Recipe
Step 1: Prepare Your Oven and Baking Sheet
First things first, preheat your oven to a low 225°F (110°C). This low heat is essential to dry out the meringues without browning them. Line a baking sheet with parchment paper to ensure your meringues won’t stick and can be removed easily after baking.
Step 2: Whisk the Egg Whites to Foamy Peaks
Using a clean, dry bowl, whisk your room temperature egg whites on medium speed until they become foamy. This process usually takes about 2 minutes and is the foundation for creating light and fluffy meringue texture.
Step 3: Add Cream of Tartar and Whip Soft Peaks
Add the cream of tartar to stabilize the egg whites, then continue whisking until soft peaks form. This means the peaks gently hold their shape but still have a slight droop, which takes another couple of minutes.
Step 4: Slowly Incorporate Sugar Until Stiff, Glossy Peaks Form
The secret to perfect meringue is patience. Gradually add the granulated sugar one tablespoon at a time, whisking well between additions. After about 8-10 minutes, you should have stiff peaks that stand straight up and a lovely glossy shine.
Step 5: Fold in Vanilla Extract and Green Food Coloring
Gently fold in the vanilla extract and green gel food coloring until the mixture is just combined. This keeps the airiness intact while giving the meringues their signature Christmas tree hue.
Step 6: Pipe Your Christmas Tree Shapes
Fit a piping bag with a large star tip and fill it with your green meringue mixture. Pipe out tree shapes onto your parchment-lined baking sheet. The star tip will give your “branches” a textured look, making each tree look extra festive.
Step 7: Bake Low and Slow for Perfect Texture
Bake the meringues in your preheated oven for 1 hour and 30 minutes. It’s important to avoid opening the oven door during baking to maintain the steady low temperature, ensuring your meringues dry out nicely without cracking or browning.
Step 8: Cool in the Oven for a Crisp Finish
Turn off the oven and crack the door open slightly before letting your meringues cool inside for another 30 minutes. This gentle cooling process helps prevent cracking and keeps your delicate treats perfectly crisp.
How to Serve Christmas Tree Meringues Recipe
Garnishes
Sprinkles are the obvious festive garnish, making your Christmas Tree Meringues Recipe extra sparkle-ready. Consider multi-colored nonpareils or tiny edible pearls to mimic ornaments; a light dusting of edible glitter can also add an enchanting shimmer that wows onlookers.
Side Dishes
These meringues pair beautifully with a dollop of whipped cream or a side of rich hot cocoa. For a grown-up twist, serve alongside a drizzle of dark chocolate sauce or a spiced mulled wine to balance the sweetness with a warming contrast.
Creative Ways to Present
For a fun holiday centerpiece, arrange your meringue trees on a large platter with a sprinkle of coconut flakes beneath to look like snowy ground. Alternatively, stack smaller trees on tiered dessert stands or even use them as cupcake toppers for a truly charming holiday display.
Make Ahead and Storage
Storing Leftovers
Keep your Christmas Tree Meringues Recipe fresh by storing them in an airtight container at room temperature. This helps maintain their crisp outer shell while keeping them ready to enjoy for up to a week.
Freezing
If you want to save these festive delights for later, meringues freeze beautifully. Place them in an airtight container, separating layers with parchment paper, and freeze for up to 2 months. When ready to enjoy, simply thaw at room temperature.
Reheating
Reheating meringues isn’t usually necessary or recommended since they are best crisp and light. However, if they lose some crunch after freezing, you can warm them gently in a low oven (about 200°F) for 5-10 minutes to refresh their texture.
FAQs
Can I make these meringues without cream of tartar?
Cream of tartar helps stabilize the egg whites and improve volume, but if you don’t have it, a small squeeze of lemon juice can be used as a substitute. Your meringues might be slightly less stable but will still turn out delicious.
Can I use powdered sugar instead of granulated sugar?
It’s best to stick with granulated sugar for this Christmas Tree Meringues Recipe. Powdered sugar contains cornstarch, which can affect the texture and prevent the meringues from achieving that perfect glossy stiffness.
What if I don’t have gel food coloring?
Gel food coloring provides vibrant color without adding too much liquid, which keeps your meringues stable. If you only have liquid food coloring, use it sparingly to avoid making the mixture too runny and compromising the texture.
How do I know when the meringues are done baking?
The meringues should be dry to the touch and easily lift off the parchment paper. The low and slow baking dries them out without browning. The cooling step in the oven also helps finish the drying process perfectly.
Can I make these meringues in other shapes?
Absolutely! While the Christmas tree shape is festive and fun, any piping shape you love can work. Stars, hearts, or even simple dollops make beautiful meringue treats; just adjust the baking time slightly for larger or thicker shapes.
Final Thoughts
This Christmas Tree Meringues Recipe is a joyful way to sprinkle some extra magic onto your holiday season. Light, sweet, and visually stunning, these meringues make the perfect homemade gift or centerpiece for any festive table. I truly hope you enjoy making them as much as your family and friends will love eating them. Give it a try and let your holiday sparkle through every bite!
Print
Christmas Tree Meringues Recipe
- Prep Time: 20 minutes
- Cook Time: 1 hour 30 minutes
- Total Time: 2 hours 10 minutes
- Yield: 12 servings
- Category: Dessert
- Method: Baking
- Cuisine: American
- Diet: Vegetarian
Description
Delight in these festive Christmas Tree Meringues, a perfect holiday treat featuring light, airy, and sweet meringue shaped like Christmas trees. They are stabilized with cream of tartar, flavored with vanilla, tinted green with gel food coloring, and optionally decorated with colorful sprinkles for a fun festive touch.
Ingredients
Meringue Base
- 4 large Egg Whites (Ensure they’re at room temperature)
- 1 cup Granulated Sugar (Adds sweetness and glossy texture)
- 1 teaspoon Cream of Tartar (Stabilizes egg whites)
- 1 teaspoon Vanilla Extract (Infuses flavor into the meringue)
- 1 teaspoon Green Gel Food Coloring (Customize color)
Optional Toppings
- 1 cup Sprinkles (Festive toppings)
Instructions
- Preheat Oven: Preheat your oven to 225°F (110°C) and line a baking sheet with parchment paper to ensure the meringue doesn’t stick.
- Whisk Egg Whites: Whisk the egg whites in a clean, dry bowl on medium speed until foamy, about 2 minutes, creating the initial air structure.
- Add Cream of Tartar: Add the cream of tartar and continue whisking until soft peaks form, approximately 2 minutes, for stability in the meringue.
- Incorporate Sugar: Gradually add granulated sugar, one tablespoon at a time, whisking continuously for 8-10 minutes until stiff, glossy peaks form, ensuring a smooth and firm meringue.
- Add Flavor and Color: Gently fold in the vanilla extract and green gel food coloring until just combined, making sure the meringue is evenly tinted.
- Pipe Meringue Trees: Fit a piping bag with a large star tip, fill it with meringue mixture, and pipe Christmas tree shapes onto the prepared baking sheet.
- Bake: Bake in the preheated oven for 1 hour and 30 minutes without opening the door to prevent cracking and retain a crisp texture.
- Cool Gradually: Turn off the oven, slightly crack the door open, and allow the meringues to cool inside for 30 minutes to set completely and avoid moisture buildup.
- Decorate (Optional): Once cooled, top the meringue Christmas trees with colorful sprinkles for an extra festive look and added crunch.
Notes
- Make sure egg whites are at room temperature for better volume.
- Do not open the oven during baking to prevent meringue from cracking.
- Use gel food coloring to avoid altering the consistency of the meringue.
- Store meringues in an airtight container to maintain crispness.
- Optional sprinkles can be replaced with edible glitter or mini chocolate chips for variation.
