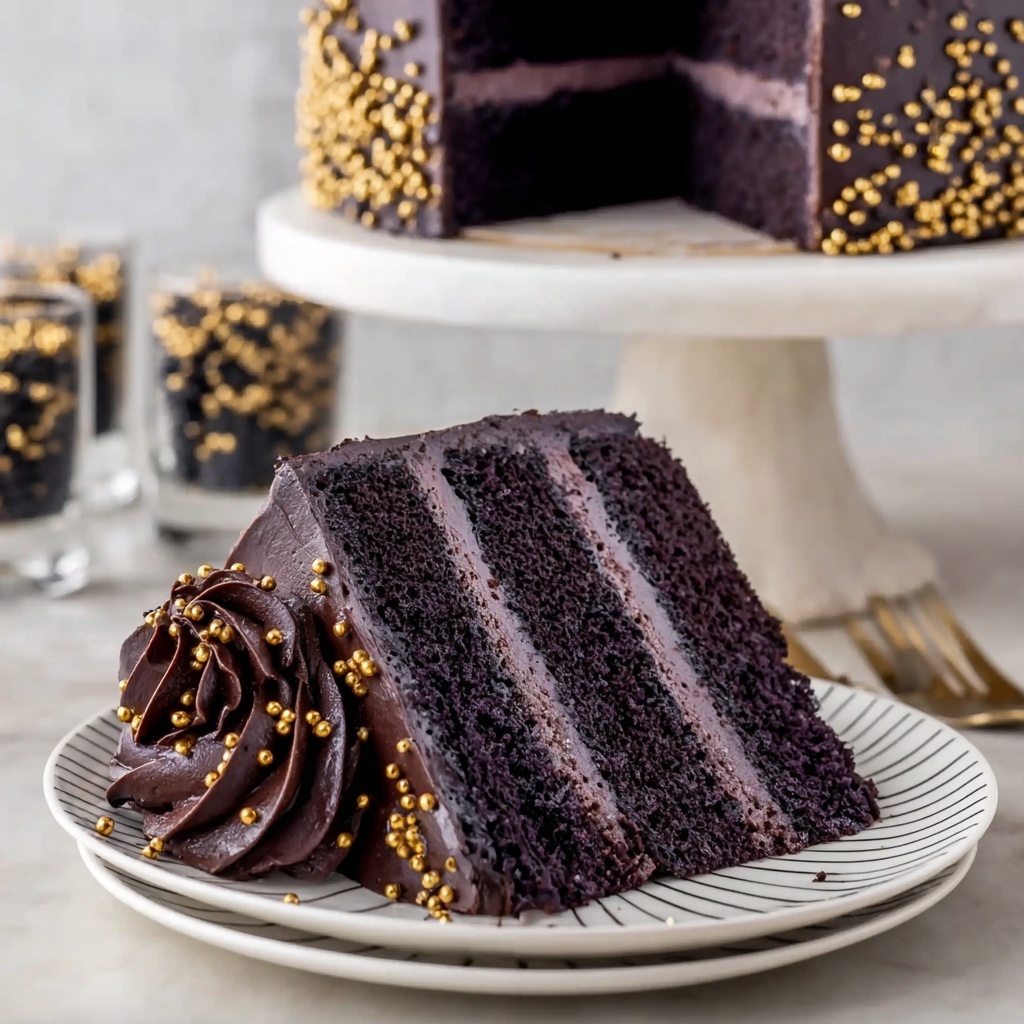
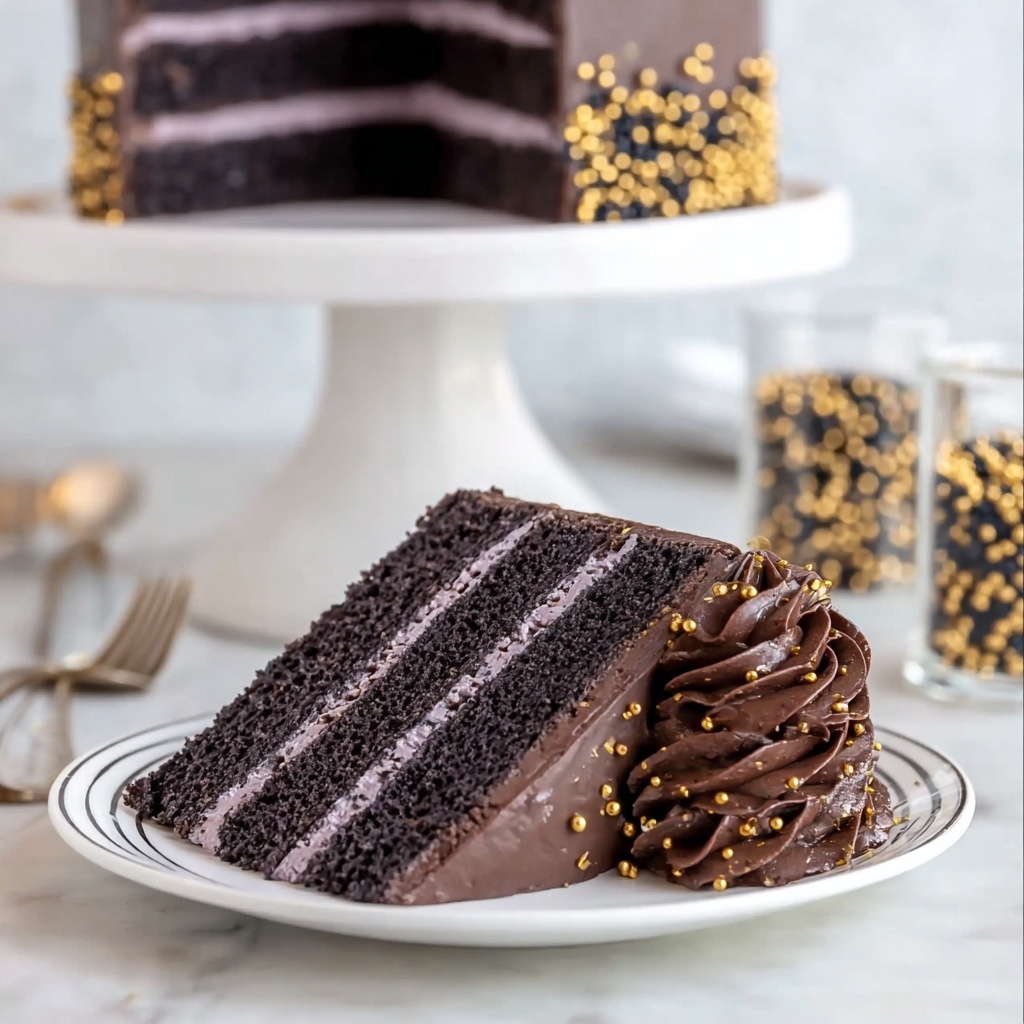
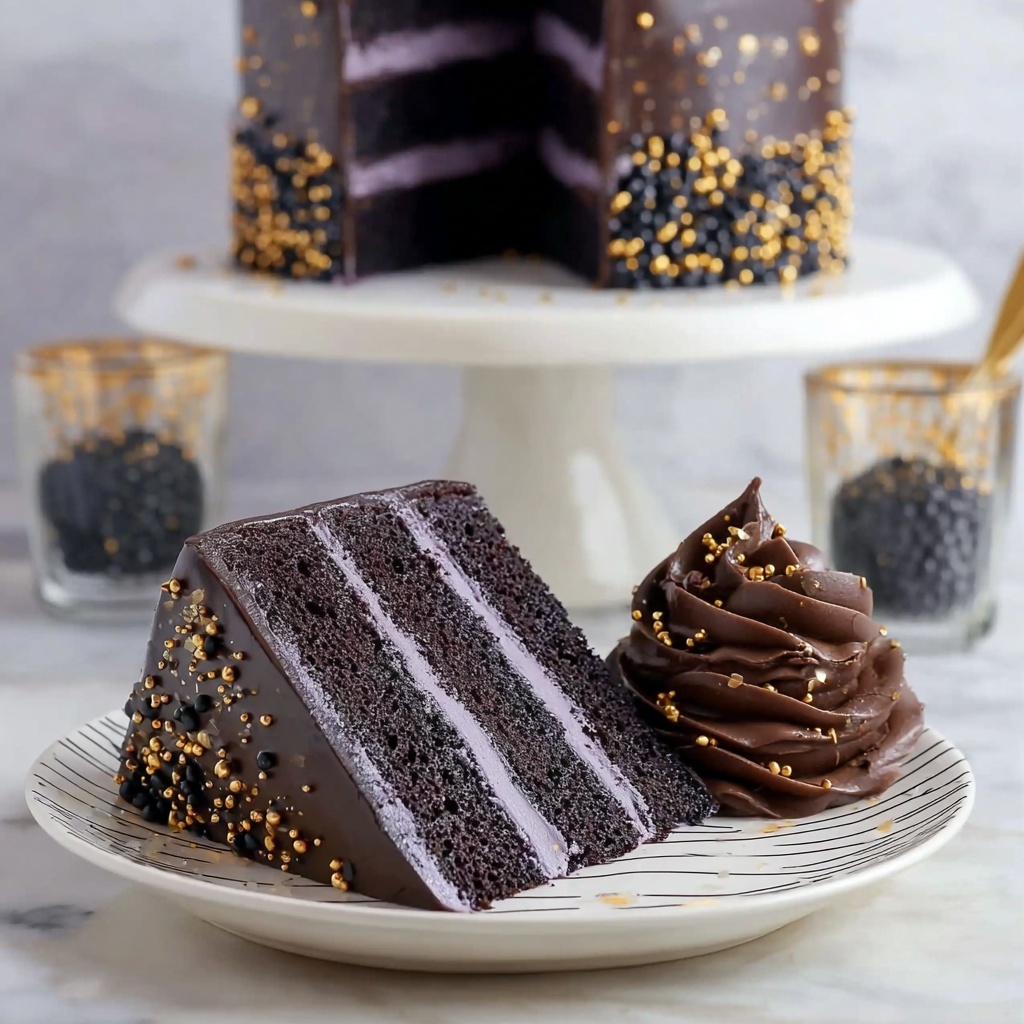
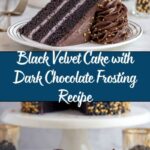
If you adore deep, intense chocolate flavors but crave a twist on the classic red velvet, the Black Velvet Cake with Dark Chocolate Frosting Recipe is here to sweep you off your feet. This cake is not only stunning with its rich, ebony layers but also delivers an unforgettable moist crumb and a frosting so decadently smooth and chocolatey, you’ll find it hard to share. Combining black cocoa’s unique roasted notes with a luscious, melt-in-your-mouth dark chocolate frosting elevates this dessert to a level of indulgence you’ll want to make over and over again. Whether for a special occasion or just to treat yourself, this cake promises both wow factor and comforting satisfaction.
Ingredients You’ll Need
Gathering a handful of simple yet crucial ingredients is the secret to crafting this fantastic black velvet cake. Each component plays an essential role, from the bold black cocoa powder enriching the cake’s color and depth to the buttermilk delivering tender texture and the dark chocolate creating a frosting that’s both luxurious and balanced. You don’t need anything complicated, but choosing quality ingredients will truly make your cake shine.
- 2 cups all-purpose flour: Forms the sturdy yet tender structure of the cake layers.
- 2 cups granulated sugar: Sweetens while enhancing the cake’s moistness.
- 3/4 cup black cocoa powder: The star of the show that provides an intense chocolate flavor and gorgeous dark color.
- 2 tsp baking powder: Helps the cake rise for a light crumb.
- 1 1/2 tsp baking soda: Works together with baking powder for perfect fluffiness.
- 1 tsp fine salt: Balances sweetness and amplifies flavor.
- 1 cup hot water: Activates cocoa and dissolves espresso for deep flavor infusion.
- 2 tsp instant espresso or coffee powder: Intensifies the chocolate notes beautifully.
- 1 cup buttermilk, room temperature: Adds acidity for tender, moist crumb and richness.
- 1/2 cup vegetable or canola oil: Keeps the cake moist without overpowering flavor.
- 2 large eggs, room temperature: Bind ingredients and add richness.
- 2 tsp vanilla extract or bean paste: Provides a warm, aromatic undertone.
- 2 cups unsalted butter, room temperature (4 sticks): The base of the rich dark chocolate frosting.
- 1 cup black cocoa powder: Amplifies the frosting’s deep chocolate color and flavor.
- 1 tsp vanilla extract or bean paste: Lifts the chocolate flavor in the frosting.
- 1/2 tsp fine salt: Balances the sweetness of the frosting perfectly.
- 5 cups powdered sugar: Sweetens and provides structure to the creamy frosting.
- 2/3 cup heavy whipping cream, room temperature: Creates a smooth, luscious texture in the frosting.
- 1 1/3 cups dark chocolate chips, melted and cooled: Intensifies the dark chocolate flavor and adds richness to the frosting.
How to Make Black Velvet Cake with Dark Chocolate Frosting Recipe
Step 1: Preheat and Prepare Pans
Begin by setting your oven at 350°F (175°C). Prepare your cake pans—either three 8-inch or four 7-inch rounds—by greasing and lining them with parchment paper. This will ensure your delicate black velvet layers come out flawlessly and ready for stacking without sticking.
Step 2: Mix Dry Ingredients
In a large bowl, whisk together the all-purpose flour, granulated sugar, black cocoa powder, baking powder, baking soda, and salt. Take your time to blend these thoroughly so your cake structure and chocolate intensity develop evenly in every bite.
Step 3: Dissolve Espresso in Hot Water
Next, dissolve the instant espresso or coffee powder in hot water. This simple step is a game changer, enhancing the chocolate depth and adding layers of subtle complexity that make the cake’s flavor truly pop.
Step 4: Combine Wet Ingredients
Into your espresso mixture, add the buttermilk, vegetable oil, eggs, and vanilla extract. Stir gently to combine into a smooth, velvety liquid base that will marry perfectly with your dry mix.
Step 5: Mix Wet into Dry Ingredients
Pour the wet ingredients into the dry mixture. Use a gentle hand to mix, just until everything is combined—your batter will be thin and silky, exactly how it should be to achieve that tender crumb everyone loves.
Step 6: Divide Batter and Bake
Divide the batter evenly between your prepared pans. Using a kitchen scale helps ensure each layer bakes uniformly, creating even, beautiful stacks. Bake for 24 to 27 minutes, checking with a toothpick for doneness—it should come out clean.
Step 7: Cool Cake Layers
Once baked, let the cakes cool in their pans for about 10 minutes to firm up. Then carefully loosen and invert them onto wire racks to cool completely. Patience here rewards you with smooth layers that won’t crumble during assembly.
Step 8: Level Cake Layers
After cooling, level your cake layers with a serrated knife to create flat, even surfaces. If you’re prepping in advance, wrap the layers tightly and freeze—they hold beautifully until you’re ready to frost.
Step 9: Make Buttercream Frosting
Start by whipping unsalted butter on medium speed until it’s smooth and creamy. Then, add black cocoa powder, vanilla, and salt, mixing on low until blended perfectly to build that rich, velvety base for your frosting.
Step 10: Incorporate Powdered Sugar and Cream
Gradually add powdered sugar to your butter mixture. Halfway through, pour in the heavy whipping cream to keep the frosting silky and easy to spread—a crucial step that balances texture and sweetness.
Step 11: Add Melted Dark Chocolate
Slowly mix in your cooled melted dark chocolate. Make sure it’s not too hot or it might melt the butter frosting. This step builds a deep, complex flavor profile and ensures the frosting is decadent without being too sweet.
Step 12: Assemble the Cake
Place your first cake layer on a greaseproof board, securing it with a dab of frosting. Spread an even layer of buttercream on top, stacking each layer carefully to keep your masterpiece straight and stunning.
Step 13: Crumb Coat and Chill
Apply a thin crumb coat around the entire cake to lock in stray crumbs. Smooth it out, then chill in the refrigerator for 30 minutes or the freezer for 10 minutes until firm. This makes the final frosting layer brilliantly smooth.
Step 14: Final Frosting Layer and Decorate
Finish by adding a final, generous layer of frosting. Use a bench scraper for a sleek, professional look or get creative with piping and textures. Your Black Velvet Cake with Dark Chocolate Frosting Recipe is now ready to impress and delight.
How to Serve Black Velvet Cake with Dark Chocolate Frosting Recipe
Garnishes
A few thoughtful garnishes can elevate the cake’s visual and flavor appeal. Try sprinkling cocoa nibs or dark chocolate shavings on top for added texture and drama. A light dusting of powdered sugar or edible gold leaf can add a festive sparkle that makes each slice feel extra special.
Side Dishes
This cake pairs beautifully with fresh berries like raspberries or blackberries, whose tartness cuts through the richness of the chocolate. For an indulgent treat, serve alongside a scoop of vanilla bean ice cream or a dollop of lightly sweetened whipped cream to enhance flavor contrasts.
Creative Ways to Present
Consider layering small slices on dessert plates with a drizzle of raspberry coulis or salted caramel sauce for a restaurant-quality experience at home. Alternatively, serve mini versions of this cake on petite plates for elegant cocktail parties or celebrations.
Make Ahead and Storage
Storing Leftovers
Wrap leftover slices or whole cakes tightly in plastic wrap or store in an airtight container at room temperature for up to two days. Refrigeration can slightly dry out the cake, so keep it covered and bring to room temperature before serving for the best texture.
Freezing
The cake layers and frosting freeze wonderfully. Wrap cooled, leveled layers tightly in plastic wrap and then aluminum foil to protect against freezer burn. Freeze up to three months, thawing overnight in the refrigerator before assembling and frosting.
Reheating
If you prefer your cake slightly warmed, gently microwave a single slice for 10-15 seconds. This softens the frosting and enhances the chocolate aroma, making each bite melt deliciously on your tongue.
FAQs
Can I use regular cocoa powder instead of black cocoa powder?
While regular cocoa powder will work, black cocoa powder provides the signature deep color and robust roasted flavor essential to this cake’s character. Using regular cocoa will yield a lighter color and a milder taste.
Is the espresso necessary in this recipe?
The espresso isn’t just for coffee lovers—it intensifies the chocolate flavor without adding a coffee taste, making your black velvet cake richer and more complex.
Can I substitute butter in the frosting with margarine or shortening?
Butter is recommended for its flavor and texture, but if necessary, margarine or shortening can be used. Keep in mind that the frosting’s taste and mouthfeel might be less rich and creamy.
How do I get smooth layers when stacking the cake?
Level your cake layers with a serrated knife to create flat surfaces. Use a kitchen scale to evenly distribute the batter before baking. Apply a crumb coat and chill before your final frosting to achieve a polished finish.
Can this cake be made gluten-free?
To make this recipe gluten-free, substitute the all-purpose flour with a gluten-free baking blend that contains xanthan gum. It may slightly alter the texture but can still yield a delicious cake.
Final Thoughts
Making this Black Velvet Cake with Dark Chocolate Frosting Recipe is truly a joyful experience. From the enticing aroma filling your kitchen to the first bite of that perfectly moist, deeply flavored cake with silky frosting, this dessert redefines chocolate indulgence. I promise, once you try it, this chocolate marvel will become a beloved classic in your baking repertoire that you’ll be excited to share with everyone you love.
Print
Black Velvet Cake with Dark Chocolate Frosting Recipe
- Prep Time: 20 minutes
- Cook Time: 27 minutes
- Total Time: 1 hour 5 minutes
- Yield: 20 servings
- Category: Baking
- Method: Baking
- Cuisine: American
Description
This Black Velvet Cake with Dark Chocolate Frosting is an indulgent, deeply chocolatey layered cake featuring the unique richness of black cocoa powder and espresso. The moist cake layers are complemented by a velvety dark chocolate buttercream frosting, perfect for celebrations or any special occasion. The recipe yields a moist crumb with a smooth, luscious frosting, imparting an elegant black velvet finish that’s sure to impress.
Ingredients
Cake Ingredients
- 2 cups all-purpose flour (260g)
- 2 cups granulated sugar (400g)
- 3/4 cup black cocoa powder (75g)
- 2 tsp baking powder (8g)
- 1 1/2 tsp baking soda (9g)
- 1 tsp fine salt (6g)
- 1 cup hot water (240g)
- 2 tsp instant espresso or coffee (5g)
- 1 cup buttermilk, room temperature (240g)
- 1/2 cup vegetable or canola oil (110g)
- 2 large eggs, room temperature (112g)
- 2 tsp vanilla extract or vanilla bean paste (8g)
Frosting Ingredients
- 2 cups (4 sticks) unsalted butter, room temperature (454g)
- 1 cup black cocoa powder (100g)
- 1 tsp vanilla extract or vanilla bean paste (4g)
- 1/2 tsp fine salt (3g)
- 5 cups powdered sugar (625g)
- 2/3 cup heavy whipping cream, room temperature (180g)
- 1 1/3 cups dark chocolate chips, melted and cooled (230g)
Instructions
- Preheat and Prepare Pans: Preheat your oven to 350°F (175°C). Grease and line three 8-inch cake pans or four 7-inch pans to ensure the cakes bake evenly and release easily.
- Mix Dry Ingredients: In a large bowl, whisk together all-purpose flour, granulated sugar, black cocoa powder, baking powder, baking soda, and salt until well combined.
- Dissolve Espresso in Hot Water: In a medium bowl, stir instant espresso or coffee into hot water until fully dissolved to enhance the chocolate flavor depth of the cake.
- Combine Wet Ingredients: Add buttermilk, vegetable oil, eggs, and vanilla extract to the espresso mixture and stir briefly until smooth and uniform.
- Mix Wet into Dry Ingredients: Pour the wet ingredients into the dry ingredients and gently mix by hand until fully incorporated. The batter should be thin, which helps create a tender crumb in the final cake.
- Divide Batter and Bake: Evenly divide the batter among the prepared pans using a kitchen scale to ensure equal layer thickness. Bake for 24 to 27 minutes or until a toothpick inserted in the center comes out clean.
- Cool Cake Layers: Let the cakes cool in the pans for 10 minutes, then loosen with an offset spatula and invert onto wire racks to cool completely.
- Level Cake Layers: Use a serrated knife to level the tops of cooled cakes for even stacking. Wrap and freeze if preparing in advance.
- Make Buttercream Frosting: Beat unsalted butter on medium speed for 30 seconds until smooth. Add black cocoa powder, vanilla extract, and salt; mix on low until combined.
- Incorporate Powdered Sugar and Cream: Gradually add powdered sugar to the butter mixture. Halfway, add heavy cream to facilitate mixing and create a smooth, spreadable frosting.
- Add Melted Dark Chocolate: Slowly mix melted and cooled dark chocolate into the frosting on low speed until fully incorporated and silky smooth.
- Optional Coloring: Add black gel food coloring if you want a deeper black hue. Cover the frosting bowl with plastic wrap to prevent a crust until ready to use.
- Assemble Cake: Place the first cake layer on a cake board, attach with a small dab of frosting, then spread an even layer of buttercream on top. Repeat stacking with remaining layers.
- Crumb Coat and Chill: Apply a thin crumb coat to the entire cake and smooth with a bench scraper. Chill in refrigerator for 30 minutes or freezer for 10 minutes to firm up.
- Final Frosting Layer and Decorate: Apply the second, thicker layer of frosting, smooth with a bench scraper, and decorate as desired. Serve and enjoy this rich, elegant Black Velvet Cake!
Notes
- Using room temperature eggs and buttermilk helps create a smooth batter and even baking.
- Black cocoa powder provides the signature dark color and intense chocolate flavor distinct from regular cocoa.
- Instant espresso powder or coffee enhances chocolate depth without imparting a strong coffee taste.
- Ensure the dark chocolate for the frosting is melted and cooled but still fluid to blend seamlessly into the buttercream.
- Gel food coloring is optional but helps deepen the black color without affecting taste.
- Use a kitchen scale to divide batter evenly for perfectly uniform cake layers.
- Crumb coating is essential for a polished final look and to trap cake crumbs before the final frosting layer.


