“`html
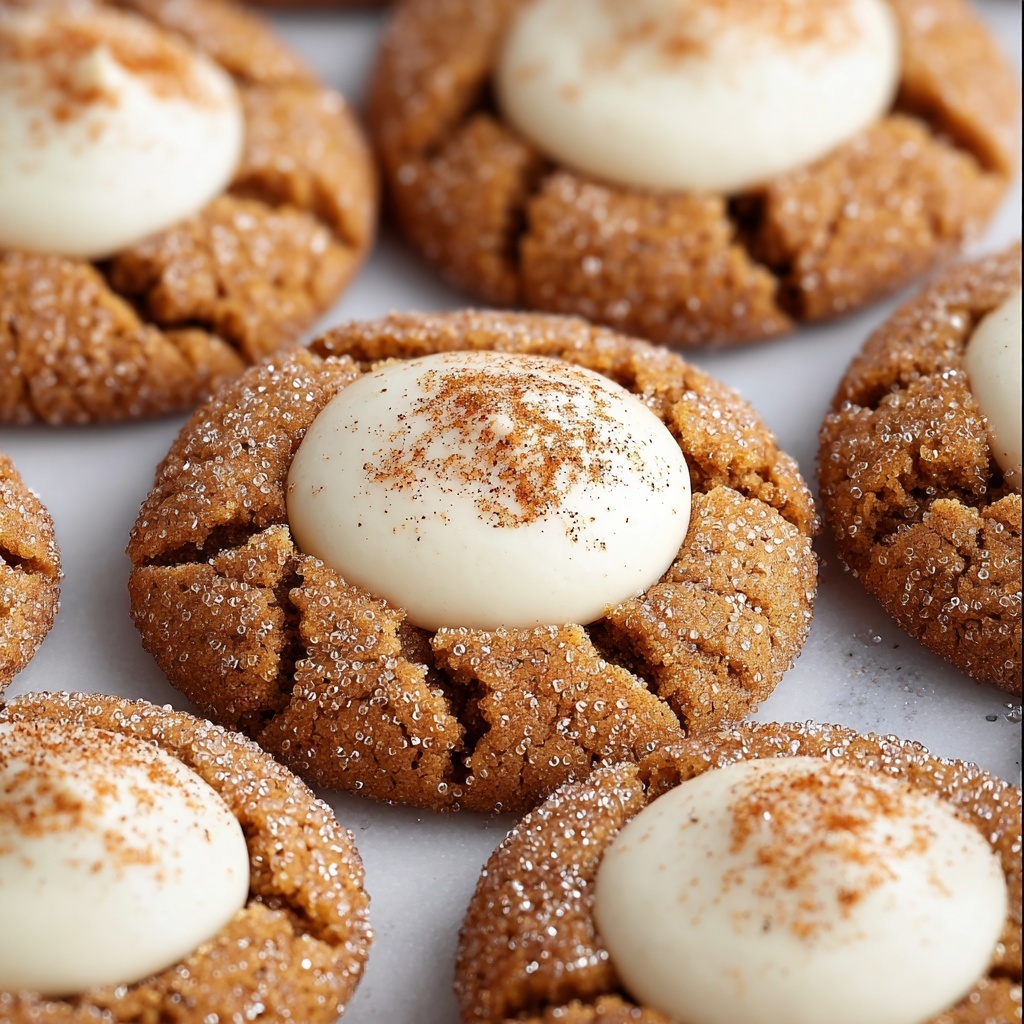
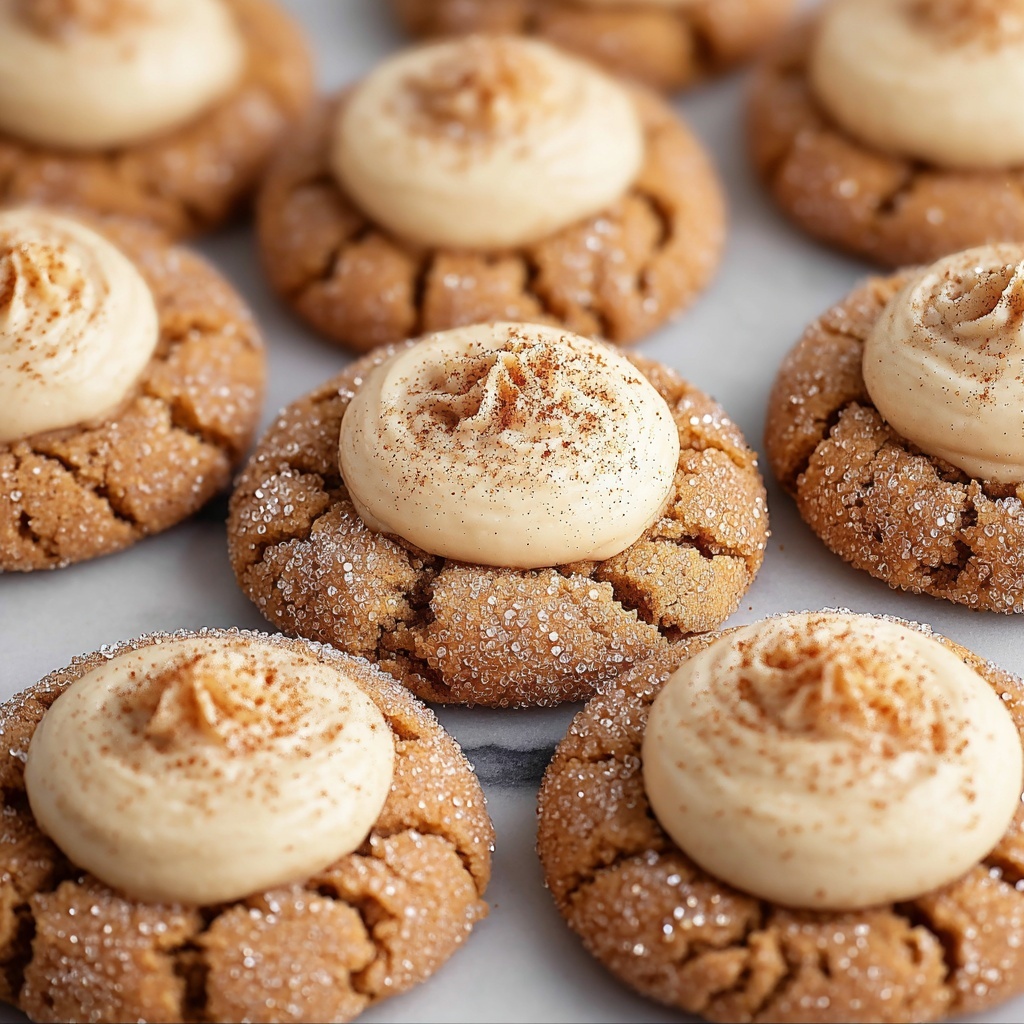
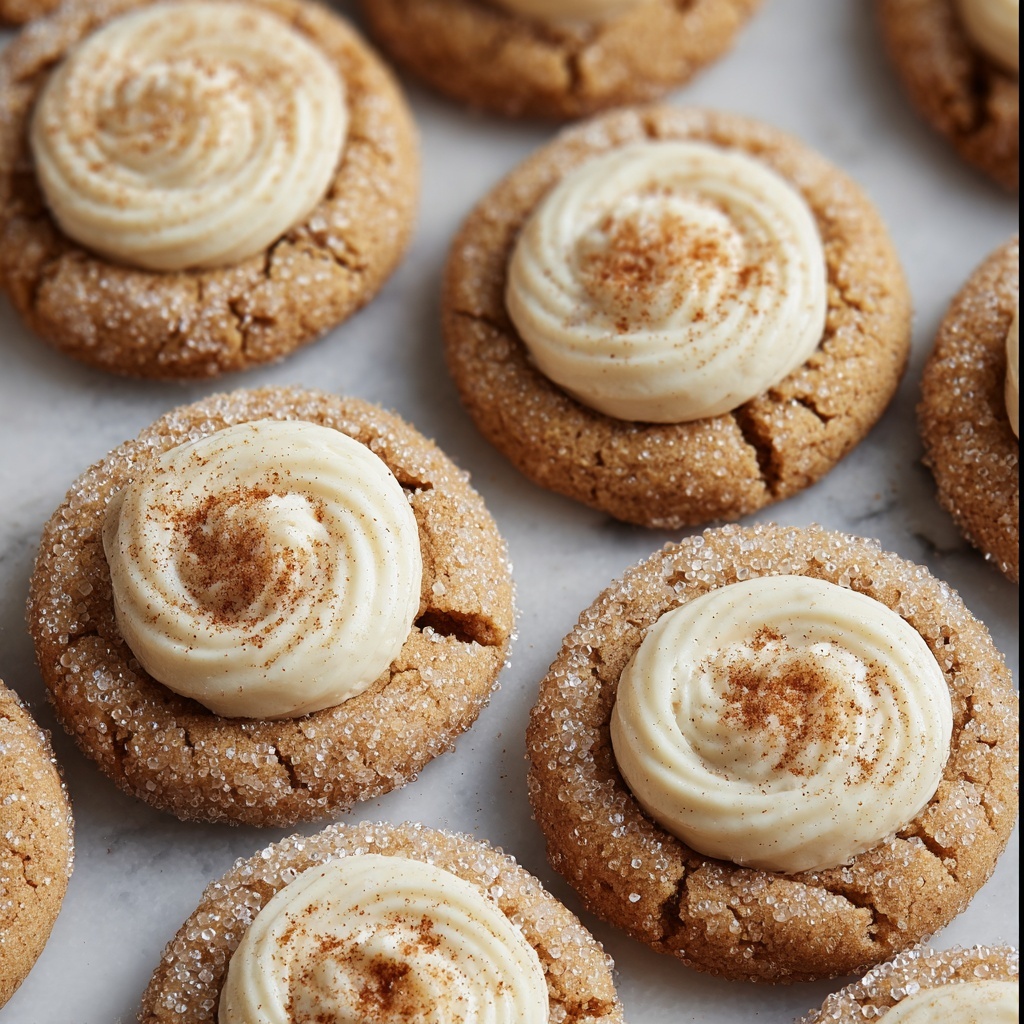
If you love holiday treats that bring cozy warmth and a fun twist to classic favorites, then this Eggnog Snickerdoodle Thumbprint Cookies Recipe is going to steal your heart. These cookies combine the cinnamon-sugar magic of snickerdoodles with a luscious, creamy eggnog white chocolate filling that’s perfectly spiced and utterly irresistible. Each bite delivers a nostalgic yet novel flavor, making these cookies a holiday must-have or a sweet surprise any time you need a little extra cheer.
Ingredients You’ll Need
Getting the perfect Eggnog Snickerdoodle Thumbprint Cookies Recipe is all about choosing simple, quality ingredients that shine together. Every component plays a key role — from the rich butter creating softness, to the cinnamon-sugar coating that adds that signature snickerdoodle snap, and finishing with a creamy eggnog-infused filling that elevates these cookies to something truly special.
- 4 ounces unsalted butter, room temperature: Provides a tender and buttery base for the cookie dough.
- ½ cup light brown sugar, gently packed: Adds moisture and a rich caramel note for depth.
- ¼ cup white granulated sugar: Gives the dough sweetness and helps with browning.
- 1 medium egg, room temperature: Binds the dough together and adds stability.
- 1 teaspoon vanilla extract: Brings warmth and enhances the other flavors.
- 1¾ cups all-purpose flour: The foundation for the dough’s structure.
- ¼ teaspoon kosher salt: Balances sweetness and intensifies the cinnamon.
- ¼ teaspoon baking soda: Helps with gentle rising and texture.
- ½ teaspoon cream of tartar: Essential for that classic snickerdoodle tang and chewiness.
- ⅓ cup sugar mixed with 2 tablespoons cinnamon: For that iconic snickerdoodle coating, adding spice and crunch.
- 4 ounces white chocolate, chopped: The base for the rich and creamy filling.
- 2 tablespoons eggnog: Infuses the filling with festive flavor and smoothness.
- 1 tablespoon dark rum or ¼ teaspoon rum extract (optional): Adds complexity and a cozy holiday touch.
- ¼ teaspoon freshly grated nutmeg: Enhances the holiday spice profile with warmth and aroma.
How to Make Eggnog Snickerdoodle Thumbprint Cookies Recipe
Step 1: Prepare Your Workspace
Start by preheating your oven to 350°F (175°C) and lining a baking sheet with parchment paper. This simple first step ensures even baking and makes cleanup a breeze, setting a great foundation for your cookie-making adventure.
Step 2: Cream the Butter and Sugars
In a stand mixer, beat together the room temperature butter, light brown sugar, and granulated sugar until the mixture becomes light and fluffy. This aerates the dough, which is key for that perfect snickerdoodle texture. Don’t forget to scrape down the sides to make sure everything blends smoothly.
Step 3: Add Egg and Vanilla
Next, incorporate the egg and vanilla extract. Mix until you get a smooth, homogenous dough. The egg acts as an emulsifier, binding the fats and liquids, while vanilla adds that inviting fragrance that makes snickerdoodles so comforting.
Step 4: Combine Dry Ingredients
Mix together the flour, baking soda, cream of tartar, and kosher salt in a separate bowl before adding them to your wet ingredients. Stir until just combined. These dry components are what give your cookies their structure and the signature tangy bite snickerdoodles are known for.
Step 5: Shape and Coat the Cookies
Use a cookie scoop or tablespoon to portion out dough balls, then roll each ball in the cinnamon-sugar mixture. This coating delivers that classic snickerdoodle snap and cinnamon crunch on the outside.
Step 6: Create the Thumbprint Indentations
Place the coated dough balls on your baking sheet and gently press down the center using a thumb or a ½ teaspoon to create a deep indentation. This well will hold the luscious eggnog white chocolate filling later, so be sure it’s nicely formed.
Step 7: Bake and Set Indentations
Bake the cookies for 7 minutes. If the centers puff up during baking, press them down gently while still warm to maintain the perfect thumbprint shape. Baking just until the edges set keeps the cookies tender inside.
Step 8: Prepare the Eggnog White Chocolate Filling
Microwave the chopped white chocolate and eggnog in short bursts, stirring frequently until the mixture is silky smooth. Stir in the optional dark rum or rum extract and freshly grated nutmeg for an extra festive kick.
Step 9: Fill the Cookies
Use about ½ teaspoon of the white chocolate-egg nog ganache to fill each cookie’s indentation. The creamy, spicy filling contrasts beautifully with the cinnamon-coated cookie, making every bite pure delight.
Step 10: Let the Filling Set
Allow the filled cookies to sit at room temperature until the filling firms up, or pop them in the refrigerator if you prefer a quicker set. This resting time helps the flavors meld and the filling to solidify just right.
How to Serve Eggnog Snickerdoodle Thumbprint Cookies Recipe
Garnishes
For a lovely finishing touch, sprinkle a little extra freshly grated nutmeg or cinnamon over the filled cookies to enhance their festive look and deepen their aroma. You can also add tiny edible gold flakes or colored sugar crystals to elevate presentation for special occasions.
Side Dishes
These cookies pair wonderfully with a warm cup of spiced tea, rich coffee, or even a glass of chilled eggnog to amplify their flavors. They also make a charming companion to creamy hot chocolate for a comforting winter treat.
Creative Ways to Present
Arrange the thumbprint cookies on a decorative holiday platter lined with evergreen sprigs or sprinkle powdered sugar for a snowy effect. Packing them in clear cellophane bags tied with a festive ribbon creates adorable homemade gifts that friends and family will adore.
Make Ahead and Storage
Storing Leftovers
Store any leftover Eggnog Snickerdoodle Thumbprint Cookies Recipe in an airtight container at room temperature for up to 4 days. This keeps them soft and fresh, preserving that wonderful cinnamon crunch and creamy filling without drying out.
Freezing
You can freeze these cookies either before or after filling. For best results, freeze the baked cookies in a single layer on a baking sheet, then transfer to a freezer-safe container. Freeze up to 3 months and thaw overnight at room temperature before filling or serving.
Reheating
If you want to enjoy these cookies warm, gently warm them in a low oven or microwave for just a few seconds. This softens the filling slightly and brings back that freshly-baked cookie magic without melting the filling completely.
FAQs
Can I make these cookies dairy-free?
Absolutely! Substitute the butter for a dairy-free margarine or coconut oil, use dairy-free white chocolate, and swap the eggnog with a dairy-free alternative like almond or oat milk eggnog to keep the festive spirit alive without dairy.
Is there an alcohol-free option for the filling?
Yes! The dark rum or rum extract is completely optional. You can simply omit it or replace it with a teaspoon of vanilla or almond extract to maintain the rich flavor without the alcohol content.
What makes snickerdoodle cookies different from other cinnamon sugar cookies?
Snickerdoodles are unique because they include cream of tartar and baking soda, which give them a distinctive tangy flavor and soft, chewy texture that sets them apart from regular cinnamon sugar cookies.
Can I use dark or milk chocolate instead of white chocolate for the filling?
You certainly can! Dark or milk chocolate will add a different flavor profile—more intense or sweeter—but keep in mind that white chocolate’s mildness pairs perfectly with the eggnog and spices in this recipe.
How do I prevent the thumbprint centers from puffing up too much while baking?
Make sure to create a deep indentation before baking and after seven minutes, gently press down any puffed centers while the cookies are still warm. This helps maintain the well shape needed for the delicious filling.
Final Thoughts
This Eggnog Snickerdoodle Thumbprint Cookies Recipe feels like a warm holiday hug in cookie form. The classic snickerdoodle spice, combined with a silky eggnog white chocolate center, makes these cookies truly unforgettable. Trust me, once you make them, they’ll be your new go-to festive treat. So go ahead, bake a batch, and share these delightful cookies with loved ones—they’re guaranteed to spread smiles and holiday cheer!
“`
Print
Eggnog Snickerdoodle Thumbprint Cookies Recipe
- Prep Time: 15 minutes
- Cook Time: 7 minutes
- Total Time: 45 minutes including cooling and setting
- Yield: 36 cookies
- Category: Dessert
- Method: Baking
- Cuisine: American
Description
These Eggnog Snickerdoodle Thumbprint Cookies are a festive twist on classic snickerdoodles, filled with a creamy white chocolate and eggnog ganache infused with a hint of rum and freshly grated nutmeg. Soft, cinnamon-sugar coated cookies combined with a luscious holiday-inspired filling make these cookies perfect for holiday parties or cozy winter treats.
Ingredients
Cookies
- 4 ounces (1 stick) unsalted butter, room temperature
- ½ cup light brown sugar, gently packed
- ¼ cup white granulated sugar
- 1 medium egg (about 50 grams), room temperature
- 1 teaspoon vanilla extract
- 1¾ cups (245 grams) all-purpose flour
- ¼ teaspoon kosher salt
- ¼ teaspoon baking soda
- ½ teaspoon cream of tartar
- ⅓ cup sugar mixed with 2 tablespoons cinnamon
Filling
- 4 ounces white chocolate, chopped
- 2 tablespoons eggnog
- 1 tablespoon dark rum or ¼ teaspoon rum extract (optional)
- ¼ teaspoon freshly grated nutmeg
Instructions
- Preheat the oven: Preheat your oven to 350°F (175°C) and line a baking sheet with parchment paper to prevent sticking and make cleanup easier.
- Cream butter and sugars: Using a stand mixer, cream together the room temperature butter, light brown sugar, and white granulated sugar until the mixture is light and fluffy, scraping down the sides as needed to ensure even mixing.
- Add wet ingredients: Mix in the egg and vanilla extract until the batter is smooth and fully combined.
- Incorporate dry ingredients: Add the flour, baking soda, cream of tartar, and kosher salt to the wet mixture. Mix until the dough just forms, taking care not to overmix.
- Shape cookies: Scoop the dough into 1-tablespoon balls. Roll each ball in the cinnamon-sugar mixture thoroughly, then place them spaced out on the prepared baking sheet.
- Create indentations: Using a ½ teaspoon or your thumb, press down the center of each cookie ball to create a thumbprint indentation for the filling.
- Bake cookies: Bake the cookies for 7 minutes. If the centers puff up during baking, gently press them down while still warm to maintain the thumbprint shape.
- Prepare the filling: Microwave the chopped white chocolate and eggnog in short intervals, stirring frequently until melted and smooth. Stir in the dark rum or rum extract if using, along with the freshly grated nutmeg.
- Fill cookies: Spoon about ½ teaspoon of the white chocolate ganache into each cookie’s indentation. Sprinkle a pinch of extra nutmeg on top for added flavor and aroma.
- Set filling: Allow the filled cookies to set at room temperature for several hours to firm up. For quicker results, refrigerate the cookies until the filling is firm.
Notes
- For a non-alcoholic version, omit the rum or use rum extract.
- Make sure the butter and egg are at room temperature for optimal mixing.
- Store cookies in an airtight container in the refrigerator to keep the ganache filling firm.
- Let cookies come to room temperature before serving for the best flavor and texture.
- If ganache hardens too much, soften slightly by microwaving briefly before filling.


